


When GIS professionals think of maps, our minds wander anywhere from locating water meters for the town to the workflow required to analyze the carbon sequestration potential of rainforests. When non-GIS users think of maps, their first thought is most likely getting directions from one place to another. When you pull out your phone to find directions from your house to the coffee shop downtown, there are options for multiple modes of transportation, but none of them include an option compliant with the American Disabilities Act (ADA). As a society, we are continuing to make improvements towards a more accessible built environment, specifically by meeting ADA standards, but there is still work to be done. It is something we should all be vigilant of and cannot let fall to the wayside.
One of the more powerful GIS components is the network dataset and associated Network Analyst tools. Network datasets are used to model transportation networks regardless of mode of transport. When a user creates a network dataset, they will specify which feature layers should be included, then set rules to represent the way those features can be used or traveled on in the real world. As a simple example, the user can set up one-way streets to only be navigable in one direction. If routing and implementing network datasets are of interest, I recommend perusing Esri’s documentation and training resources (linked below) to learn more.
Improving Inclusiveness of Routing Networks
I recently worked with a local university to update their campus routing network to include ADA pathways. They have two feature classes for pathways in their database: one with ADA pathways and another that does not specify accessibility. (The latter is the feature class being used in the network dataset.) With the existing network in good standing, the first step was to add a field where we could specify ADA compliance status. I called mine “ADA_COMP” and set the domain to Yes/No. Since there were pathways in two different locations, I combined the features and added any records from the ADA feature class that did not already exist in the other. The goal was to make sure all pathways were accounted for and in the same location, which is the feature class involved with the network dataset. If all pathways in your area of interest are already combined, do not worry about this step. The final data preparation step was to fill in the “ADA_COMP” field for all pathways. In many cases, this could require ground-truthing.
Once the data were updated, I added an ADA travel mode – this allows the user to distinguish between ADA and non-ADA travel modes – then applied restrictions to the network dataset. Below are the steps to update the network dataset:
- Remove the network dataset from any open maps.
- In Catalog, right click the network dataset and open the properties.
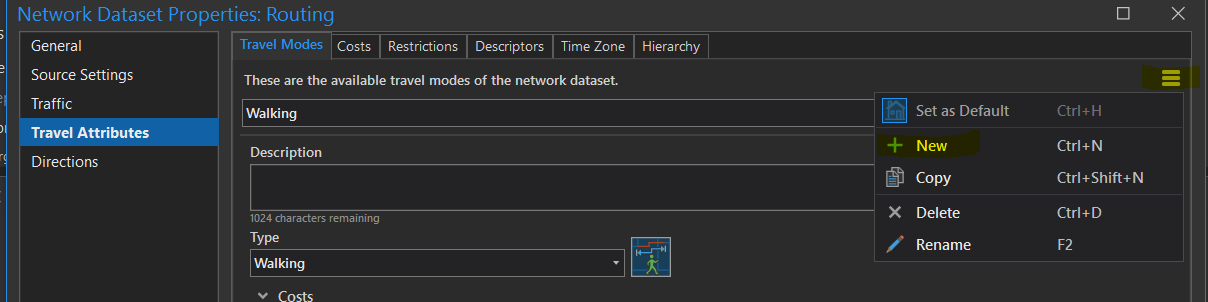
- On the side, click “Travel Attributes”, and on the “Travel Modes” tab, click the hamburger menu icon on the top right corner.
- Select “New” and give the new mode a name. I called mine “ADA Compliant”.
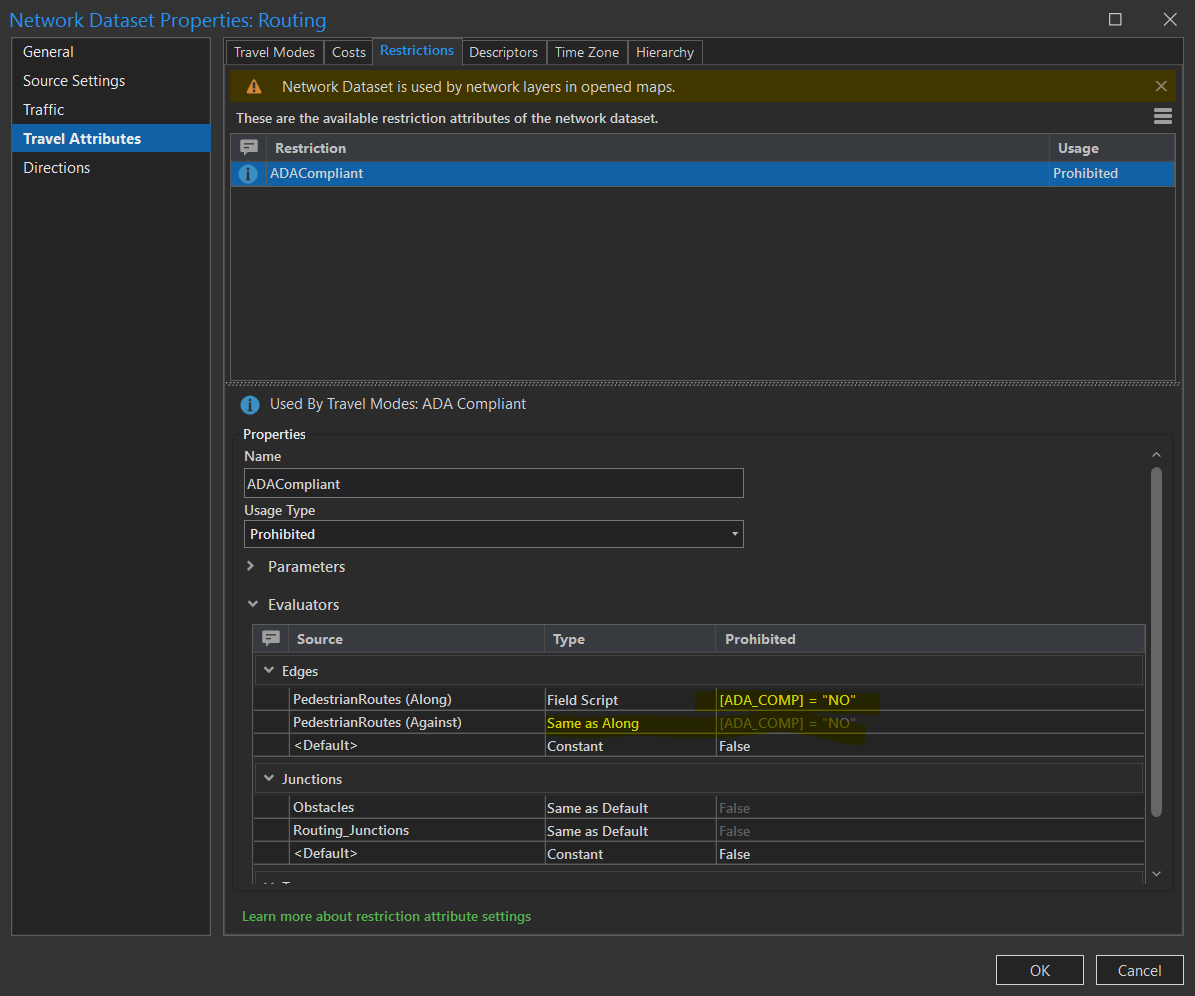
- To add a new restriction, open the “Restrictions” tab at the top of this window.
- Click the hamburger menu icon and click “New”.
- Name the restriction and set the usage to Prohibited. I called my restriction “ADACompliant”.
- In the “Evaluators” section, configure the edge parameters. Set “Along” and “Against” to [ADA_COMP = “NO”] (highlighted below). This prohibits any pathways that are not ADA-compliant from being used in an ADA route.
Once you add a restriction, apply it to the appropriate travel mode.
- Click “Travel Modes”, where you should see “ADACompliance” under “Restrictions”.
- Using the dropdown menu at the top, click each travel mode to configure the restrictions.
- For the ADA Compliant travel mode, check the box next to the new restriction. Below are screenshots of this step.


With this configuration in place, add the network dataset to a map and test a few routes. To confirm everything is working as it should, create two (or more) stops in a Route Analysis and run it for both ADA and non-ADA travel modes. In terms of placing test stops, I would recommend dropping them at points with a combination of ADA and non-ADA pathways between them, so you can easily see the different route solutions. In the screenshot below, there is a clear difference in the route, which confirms the network is working properly. For context, pink paths are non-ADA, green paths are ADA, and the dark green line is the route between the two pink points, which are the stops I created. The route on the left is ADA-compliant and the one on the right is not ADA-compliant.

With this simple modification to an existing routing network, navigation becomes more inclusive and beneficial to all users. If you are interested in improving a network dataset within your organization, contact GEO Jobe at connect@geo-jobe.com. We will be happy to assist with these types of updates.
Helpful resources: