


Leveraging Inline Variable Substitution
Introduction
ModelBuilder™ is a tool within ArcGIS® Pro that allows the user to combine different geoprocessing tools and steps to help automate geoprocessing workflows. ModelBuilder enables users to connect various geoprocessing tools built into ArcGIS Pro and custom geoprocessing tools in a set sequence to reach desired data output(s). The model can then be made into a geoprocessing tool that can be shared as a standalone tool or Python script.
Working with ModelBuilder is not always straightforward, especially if you need to analyze output results for multiple features in a layer or share the created model as a geoprocessing tool. The easiest way to handle those scenarios is using inline variable substitution, which is substituting a value or data path with another, with the substituted variable enclosed in parenthesis. There are multiple ways to use inline variable solutions. For more information, Esri has great examples in their documentation for inline variable substitution.
Using inline variable substitutions is essential for many reasons, including keeping output names consistent, stopping overwriting of layers when using iterative loops, and helping prevent broken file paths when transferring models as geoprocessing tools. The following example goes over how to use inline variable substitution in ModelBuilder to create a geoprocessing workflow to count how many different types of EPA Facility Registered Services (FRS) sites are in different HUC-12 USGS Watershed boundaries. Recreating this process, especially on multiple watersheds at once, is essential for professionals working in any environmental capacity.
Tutorial
To follow along in this tutorial, please download this file, which contains the ArcGIS Pro project file and data. (The watershed dataset was downloaded from here and the EPA FRS dataset was downloaded from here.)
Note: This tutorial assumes a basic understanding of ModelBuilder* and correct license levels.
In the catalog, right-click on Watershed Model in the toolbox and open the editor (The Watershed Final model is the complete model for reference).
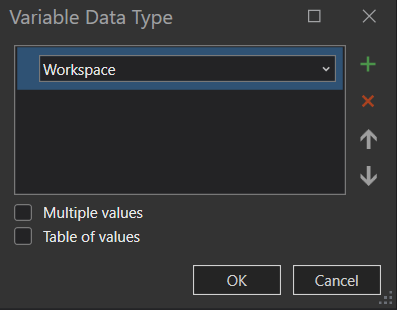
Once in the ModelBuilder view, click the Variable tool on the ribbon.

In the drop-down menu, select Workspace as your variable type and click okay.
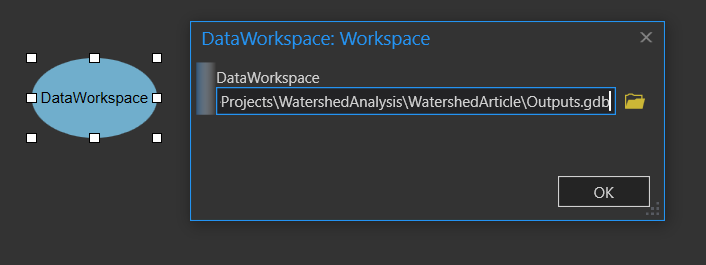
Once the variable appears in the model view, rename the input workspace variable to DataWorkspace. Open the DataWorkspace dialog box and navigate to the Outputs.gdb to set it as the input variable.
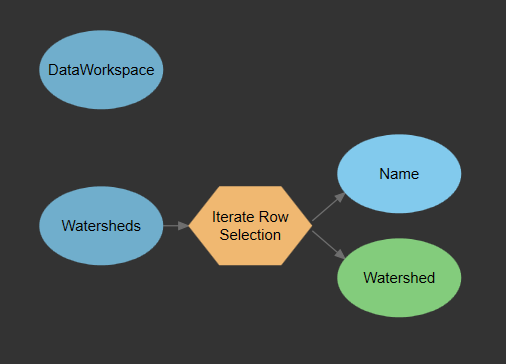
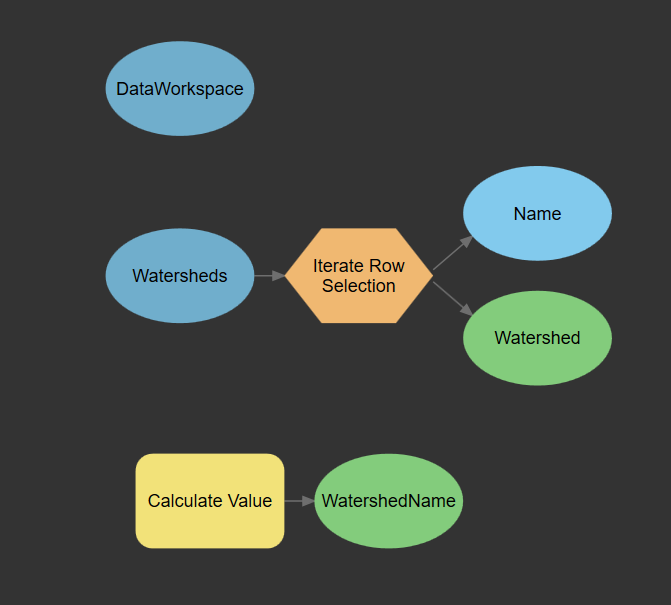
Next, in the ModelBuilder view, drag the Watersheds layer into the model. Keep the name as Watersheds. *Side note: If you want to run the model as you build for testing, use either the Jackson County Watersheds or Hancock County Watersheds instead and rename it Watersheds.
The Watershed layer has a field called Name, which identifies each HUC12 watershed. To loop through each watershed in the layer, we need to use an iterator. Click on the Iterators drop-down in the Insert grouping, and select Iterate Row Selection. This will automatically drop the Iterate Row Selection tool in your model, with two outputs: The Selected Rows data output and a string variable output called Value.

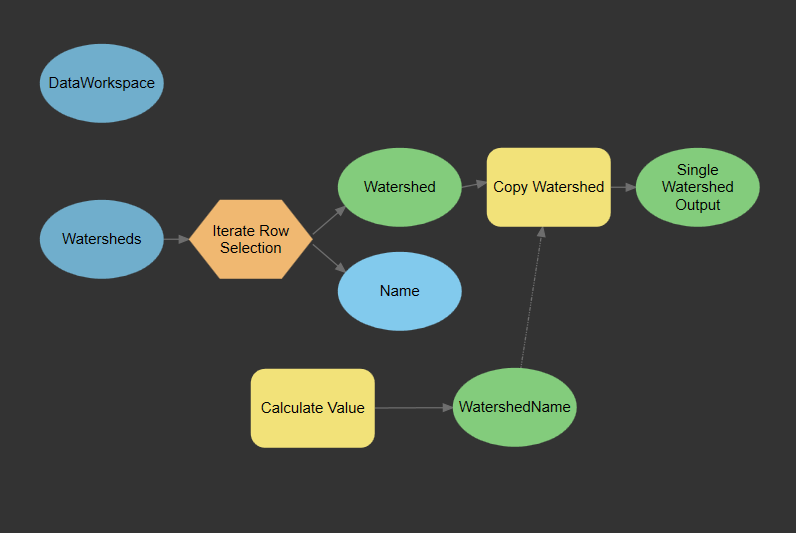
Next, connect the Watersheds Data Input into the Iterate Row Selection. Rename the Selected Rows to Watershed, and rename Value to Name. Your model should look like the following:
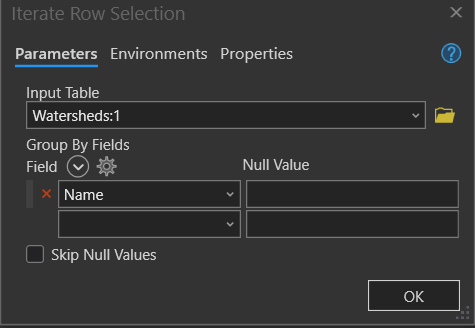
Next, open the Iterate Row Selection Tool dialog box and set the Group By Fields to Name. This will iterate through the layer for features in the Name field that have the same name. The Value (renamed Name) will be given the Value of the attribute information in the Group By field. Since each watershed name is unique, that means nothing will be grouped together. The dialog box will look like the following:
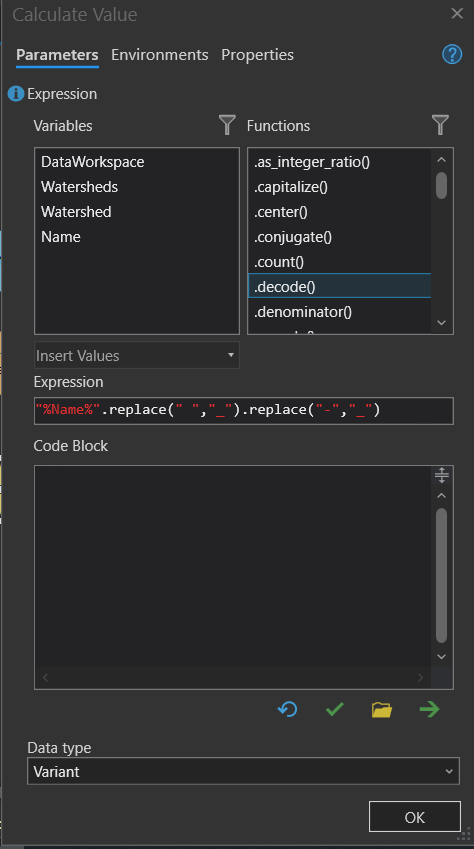
In the ModelBuilder ribbon, in the Insert Group, hit the drop-down under Utilities, and select Calculate Values. This tool will remove any values from the watershed name that will prevent it from being used as an output file name.
Rename the Value output to WatershedName.
Open the calculate Field Value dialog box and input the following in the Expression box: “%Name%”.replace(” “,”_”).replace(“-“,”_”).
Make sure the Data type is Variant
Click Okay.
To better understand what is going on with the expression:
Anything in red is a string value and must be in quotation marks.
The %Name% portion is an example of an inline substitution variable. This is calling back to the Name variable we set up in the Iterate Row Selection. If we renamed Value to be Output Name, we would use %OutputName% instead.
The .replace(“ “,”_”) means to take any spaces in the word, i.e., The Watershed, and instead makes the Name Back_Bay_Watershed.
The .replace(“-”,”_”) similarly removes – and replaces it with an _, i.e., if the watershed is named The-Watershed, it would now have a string variable name of The_Watershed.
The .replace has to be appended to the end for each potential value that would show up in the name field. There are other ways, but this is the most straightforward for two or three replacement values.
The model should look like the following:
Next, Add the Copy (Data Management) tool into the model. Open the Copy (Data Management) Dialogbox. In the Parameters tab, put in input features as Watershed and the Output Feature Class as %WatershedName%_copy. %WatershedName% is taking the WatershedName variable from the Calculate Value and giving the output watershed feature layer that name.
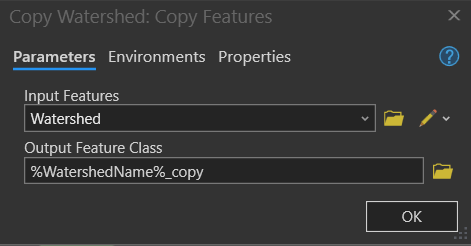
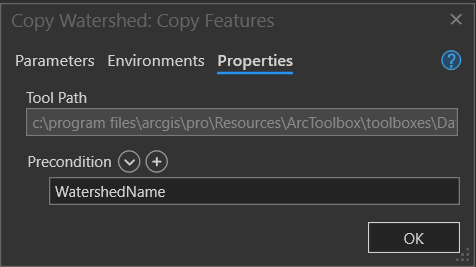
In the properties tab, make sure the Precondition is set to WatershedName. The precondition ensures that the WatershedName Calculate Value tool runs before the Copy Tool starts.
Rename the tool to Copy Watershed, and the output data to Single Watershed Output. The model should look like the following at this point:
Add the EPA Facility Registry Service layer as input data.
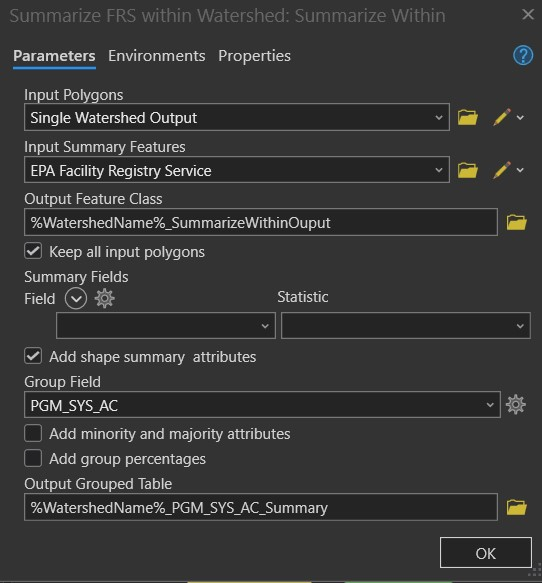
Next, add the Summarize Within tool into the model. Open the Summarize Within dialog box, and in the parameters pane, set up the following parameters:
- Input Polygons: Single Watershed Output
- Input Summary Features: EPA Facility Registry Service
Output Feature Class: %WatershedName%_SummarizeWithinOuptut - Group Field: PGM_SYS_AC
- Output Grouped Table: %WatershedName%_PGM_SYS_AC_Summary
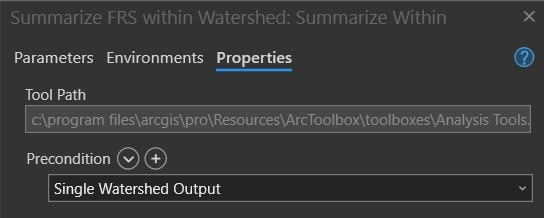
In the properties tab, put Single Watershed Output as a Precondition:
Rename the tool Summarize FRS within Watershed. Rename the Output Summarized Feature Class to Output Summarized Watershed and Output Grouped Table to Output Grouped Table Watershed. Your model should look like this:
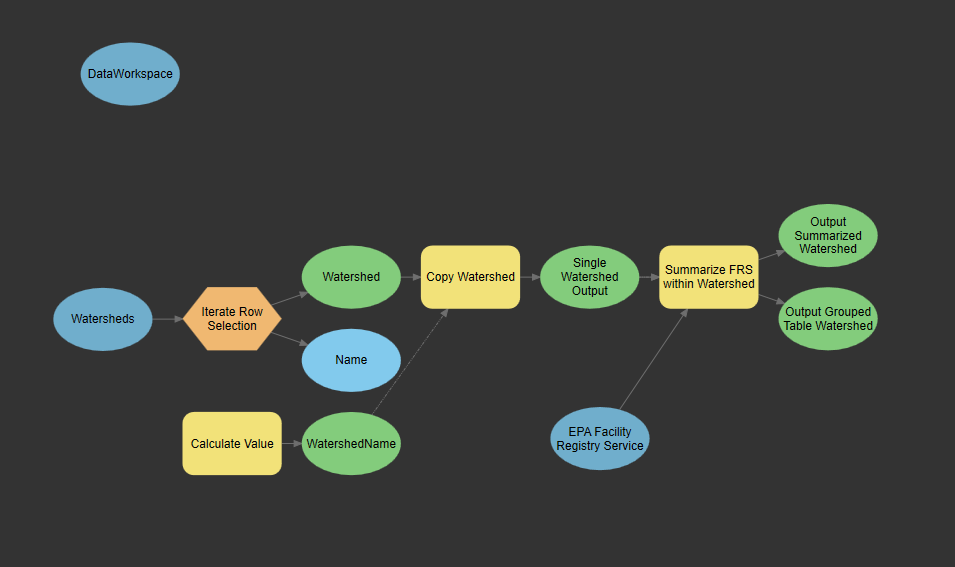
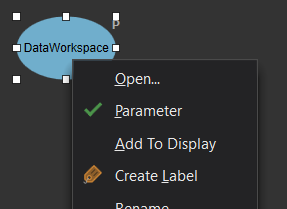
Next, right click on DataWorkspace, the Watersheds Data Input, and the EPA Facility Registry Service and select Parameter. This sets the three variables as parameters for the geoprocessing tool in which users can input information.
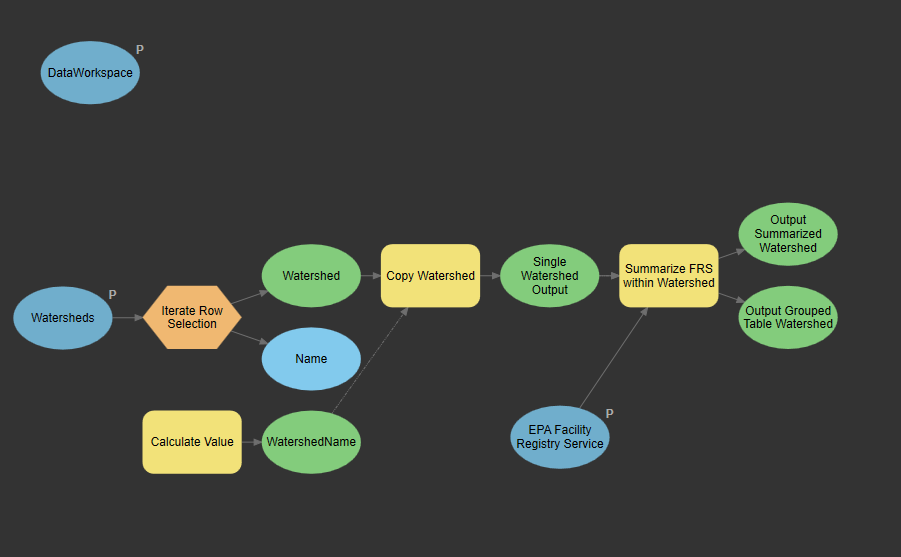
The final model should look similar to the following (if you select auto layout it may format differently):
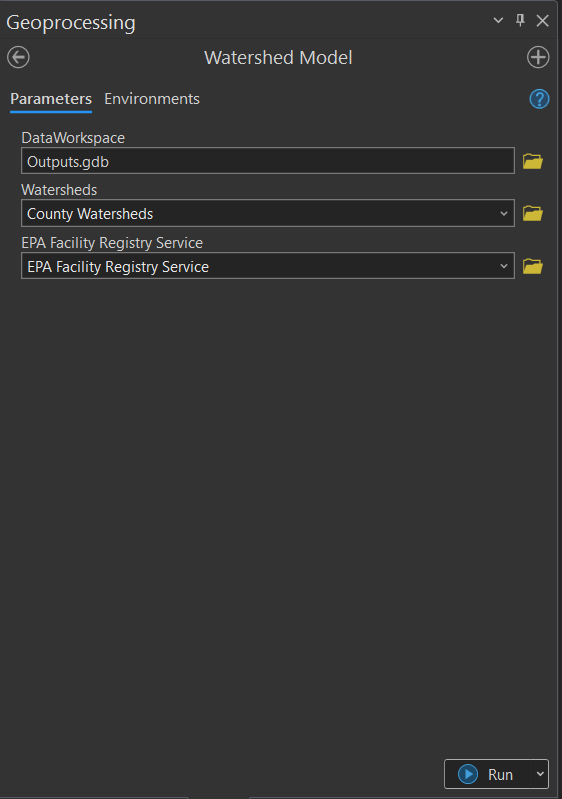
In the catalog pane, navigate to the toolbox where the model is stored and open the Watershed geoprocessing tool you created. Fill out the parameters as below and hit run.
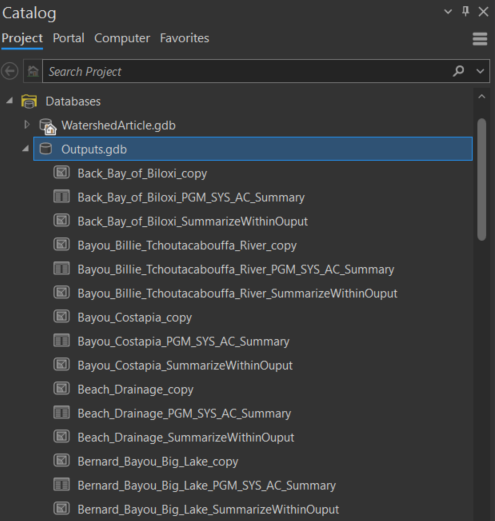
To check that all of the outputs have been outputted correctly, navigate to the Output.gdb and look to see the files contained in it (you may have to hit refresh on the geodatabase).
Final Thoughts
As you can see, inline variable substitution is a powerful tool when used in ModelBuilder. The model you built in this tutorial was simple, with a few examples of inline model substitution. This is just a glimpse of the tool but many more use cases exist. This current model is set up to overwrite layers with the same name, but inline model substitution has built-in methods to auto number instead of overwriting them. I hope this tutorial gives you a better understanding of how to use inline variable substitution and helps you create a more powerful workflow!
*If you are unfamiliar with ModelBuilder and have a current maintenance license, you can take this class from ESRI.
Does your organization require GIS services? Interested in exploring ways your business could leverage GIS? Contact GEO Jobe today at connect@geo-jobe.com for a free consultation! We are eager to support your GIS initiatives!