

Do you have imagery you would like to upload to ArcGIS Online for a basemap? Well, this article is going to take you through the steps to get you there. Come with me as we create you a custom basemap!
Prepping your Imagery
The first step in caching imagery is to create a mosaic dataset and load your imagery. This step gives you the opportunity to set the coordinate system of what will eventually become your tile cache. With that in mind, if you will be using the imagery in ArcGIS Online, select Web Mercator. If you already have your tiles in a mosaic dataset, you are ready to cache your imagery. If you need to prep your imagery, run through the simple steps below:
- Create a mosaic dataset by right-clicking the database in the Catalog pane of your Pro Project and select New, then Mosaic Dataset. For the input, Mosaic Dataset Name put whatever you would like and click Run.
- Add the tif tiles to the Mosaic Dataset. Right-click your Mosaic Dataset and select Add Rasters. Change The Raster Type to Raster Dataset and Input Data to Dataset. Now add all the tif tiles that make up the area you desire, and click Run.
- Build Item Pyramids and Statistics. Right-click your Mosiac Dataset, go to Modify and select Build Item Pyramids and Statistics.
- Build Footprints. Right-click your Mosiac Dataset, go to Modify and select Build Footprints.
- Define Overview (use the footprints created in step 3 for the extent). Right-click your Mosiac Dataset, go to Optimize and click Define Overview.
- Build Overviews. Right-click your Mosiac Dataset, go to Optimize and click Build Overviews.
Now you are ready to start caching your imagery!
Caching Your Imagery
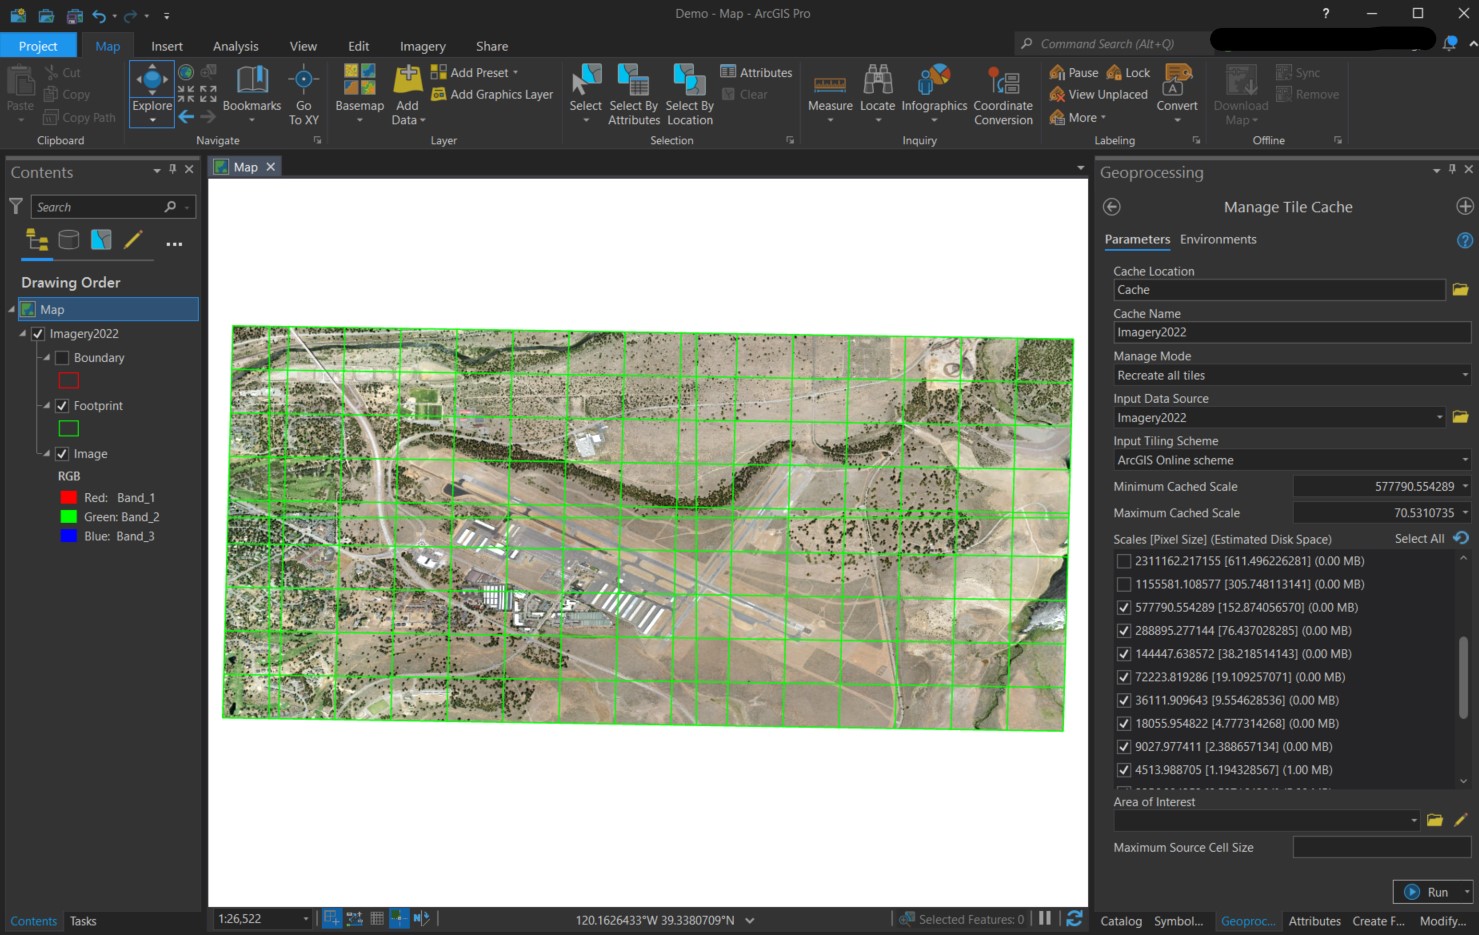
If it was not automatically added, bring the mosaic dataset you just created into the map you are working in. Once the imagery is in the map, go to the Geoprocessing tools and open the Manage Tile Cache tool. Put the information in the window:
- Cache Location: This is the folder in which the cache is stored.
- Cache Name: The name of the cached imagery. This is stored in the above folder. Ex: Imagery2022.
- Manage Mode: We want to Recreate all tiles.
- Input Data Source: Click the drop-down arrow and select the mosaic dataset you added to the map.
- Input Tiling Scheme: Select ArcGIS Online Scheme.
Now you will set your levels of detail, which can vary depending on what the imagery will be used for. Since we are going through the workflow for a basemap, a good range is levels 10 – 23, or 577790.554289 – 70.5310735. Select all checkboxes between and including those values.
After that click Run. This may take a while, depending on the size of your imagery. For very large datasets, it has taken 24-48 hours to run successfully.
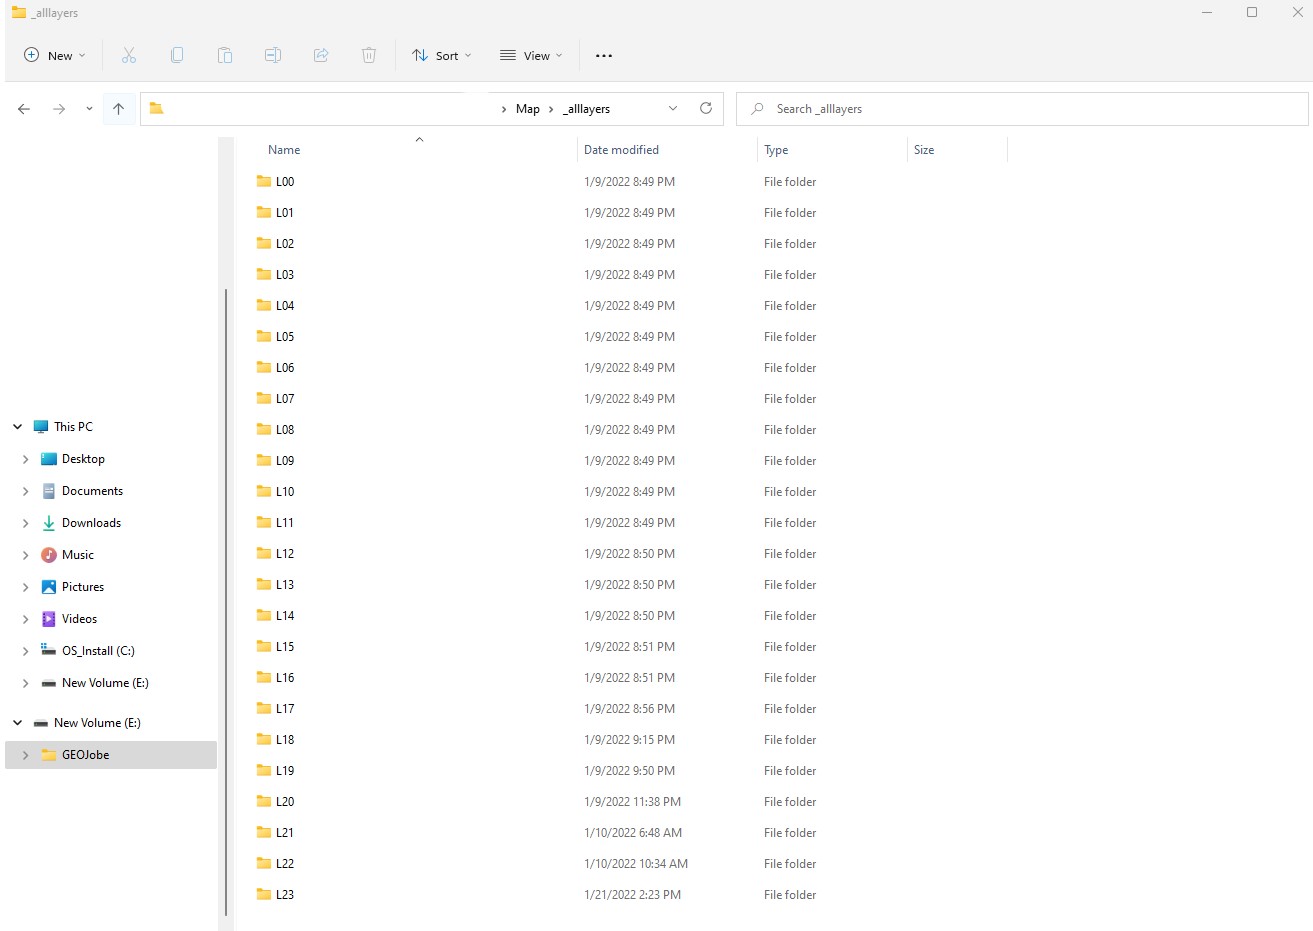
Note: Sometime after the 48 hour mark, you may see an error message alerting you to the failure of the tool. This is not always true! If this happens, check the folder where you saved the map tile cache. For this, you will navigate to the folder where your imagery was and you should see a new folder. Open the folder and keep opening the folders until you get to _alllayers folder. From there, open _alllayers and look to see how many folders you have. For the imagery in this example, I had folders ranging from L00-L23. The example below is what the folder structure looks like:
If you do not have the _alllayers with information inside the folders, you will need to repeat the steps above for caching your imagery. If you are caching a very large dataset, it is helpful to use a dedicated machine for this process, if possible.
Creating Map Tile Package
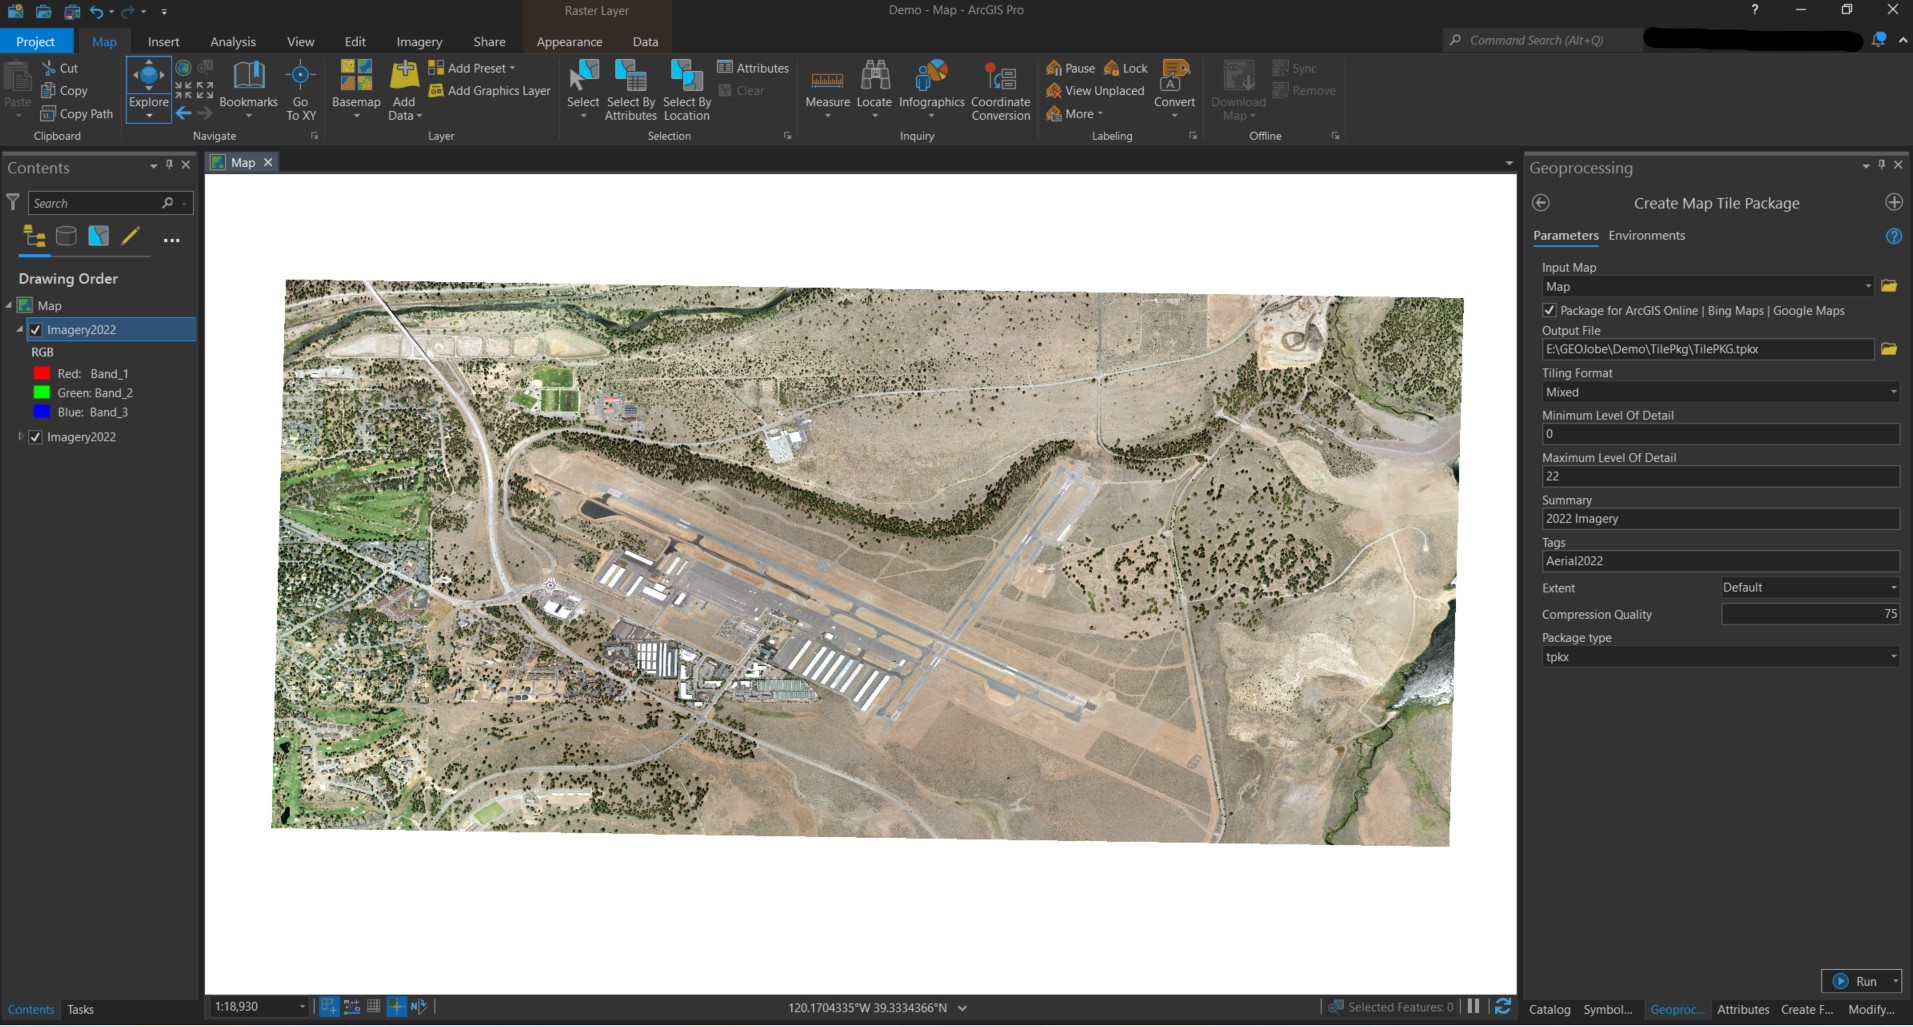
In the Geoprocessing window look for the tool Create Map Tile Package. Once you open the tool fill in the information:
- Input Map: Click the drop-down and select the map that contains your cached imagery. (Tip: If you only want the cached imagery to show up in your tile package, remove any basemaps from the map!)
- Check the box to ensure the map is packaged for use in ArcGIS Online, Bing Maps, or Google Maps.
- Output File: The location you want to save your map tile package.
- Tiling Format select Mixed.
- Minimum Level Of Detail: For this example, the minimum level of detail is 10 and the maximum level of detail is 23. You can check this by opening the _alllayers folder to see which folders contain data (this tells you that the imagery has been cached at that specific level). Once you find the lowest number folder containing data, that will be the number you put for your Minimum Level Of Detail.
- Maximum Level Of Detail is the same process as above but you will start with the highest number. The highest number folder with data in it is your maximum level of detail.
- Summary: Describe the tile package.
- Tags: Add any applicable tags.
- Extent: This is completely up to you and how you want your image to display when opened on AGOL.
- Compression Quality: I always leave the default.
- Package type: .tpkx
Once you have completely filled out the information in the window you will then click Run. This can again take a while to run…
Publishing to ArcGIS Online
Now that the .tpkx is created you will open a browser and go to ArcGIS Online. From there you will log in to your organization and navigate to your content page. Follow the instructions below:
- Click New Item at the top left of the page.

- From there a window will pop up and you will select Your device and then navigate to the .tpkx you created in the last section.
- Follow the steps below:
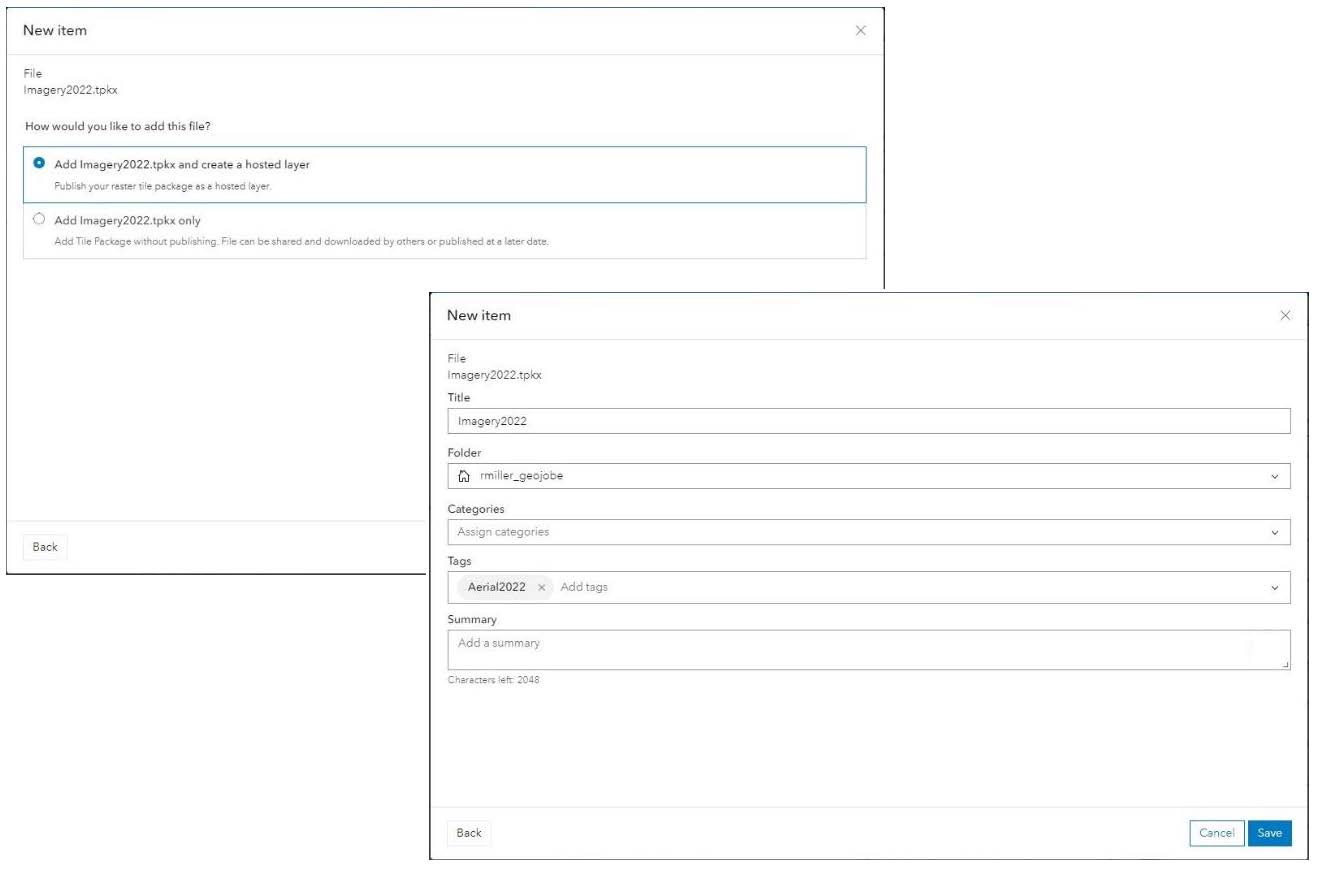
- After the information is filled out, click Save.
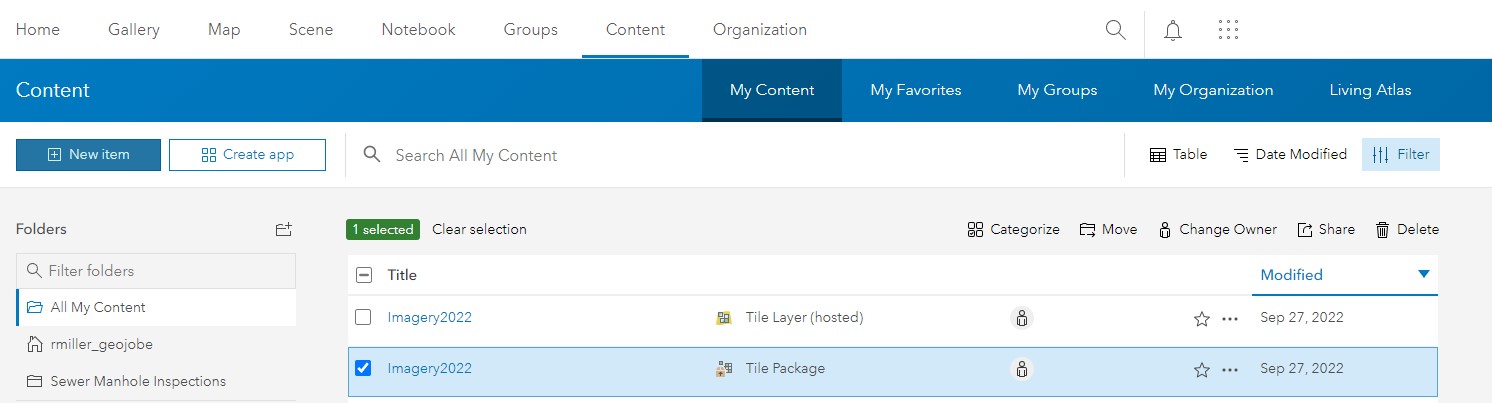
- Once it is finished loading, in the settings Mark as Authoritative. If you plan on allowing the basemap to be taken offline, scroll down and check the box under Offline Mode. Click Save.
- Go to Content and delete the Tile Package but leave the Tile Layer (Hosted). (Note: If you want people in your organization to be able to download the tile package, you can skip this step, but be aware that storing the file uses credits.)
You have published your imagery, time to make it a basemap!
Creating your Basemap
Now that you have uploaded your .tpkx and customized the settings, let’s create that basemap!
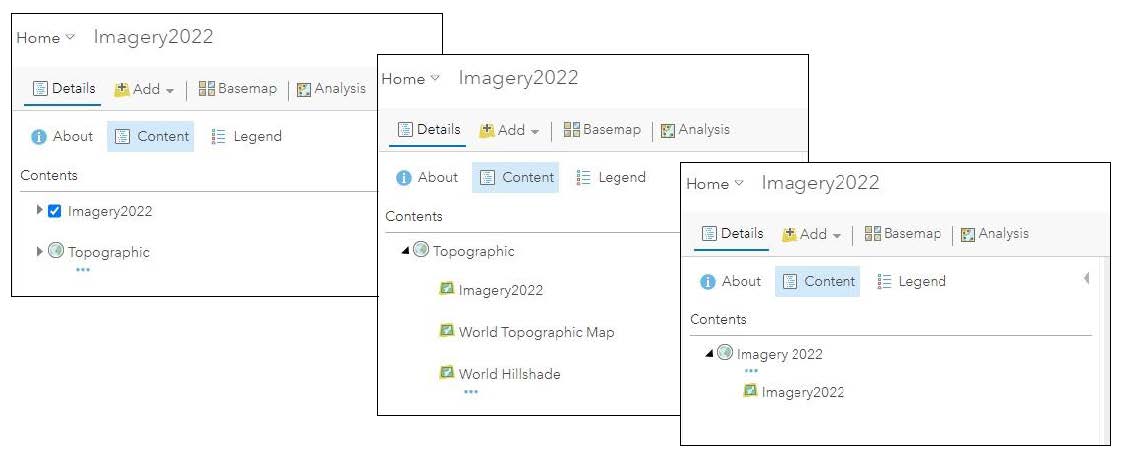
- In My Content select the Tile Layer (hosted) imagery you want. Open it in the Map Viewer Classic.
- Select the three dots under the imagery … and then select Move to Basemap.
- Now click the three dots … under the Topographic basemap and Delete it.
- Rename the basemap by clicking the three dots under Topographic and call it what you would like. Ex. 2022 Aerial.
- Now save the map!
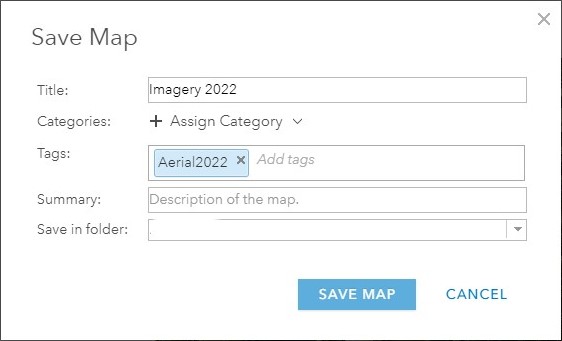
- Once the map is saved go back to My Content and select the map you just saved.
- Click Share and add it to the Basemaps group. Click Ok once you have selected the Basemaps group.

- You will want to Mark as Authoritative in Settings. You are done!
Our Services
I hope these steps and tools have helped you create a custom basemap for your organization or personal use! If you need assistance or would like assistance with this process, reach out via e-mail today! We would love to talk with you and make your life a little easier!
Want to read more articles on other tools or ArcGIS Pro? Check out these!