
Looking for a way to organize your map’s table of contents better? Want to help your users understand the numerous layers they’re looking at by grouping them in a way that makes sense? Group layers may be the answer you’ve been looking for! They allow you to put different types of data together without restrictions, making it easier to group your feature layers and raster layers in a way that makes sense for you.
Group Layers in ArcGIS Pro
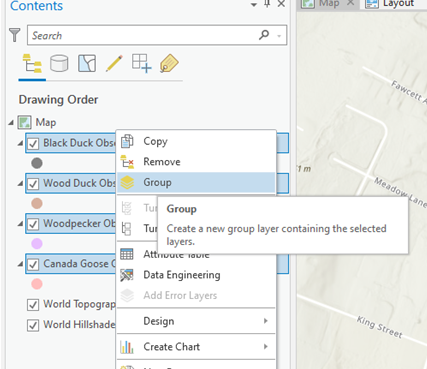
Group layers are a great resource to help organize your map and scene content to make your data easier to navigate when working in ArcGIS Pro. If you are working on a project with lots of layers and need to share the map or project with others, grouping your layers will make it easier for a user to understand your data. Below, we see the initial steps of selecting the layers to be in the group, right-clicking to get a list of operations, and choosing Group.
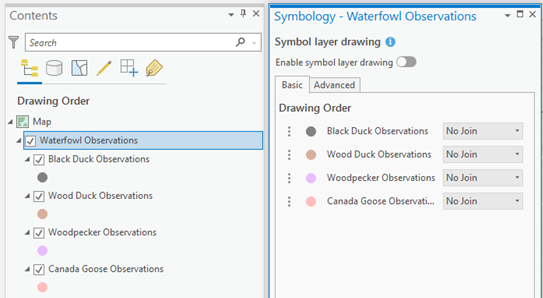
After creating a group layer, you’ll have some additional symbology options to consider, like the symbol layer drawing order seen below. These settings allow you to override the default drawing order of symbols on the map, allowing for you to reorder how the symbols in the group may overlap. You can read more about symbol layer drawing in ArcGIS Pro here.
An additional display benefit that comes with group layers is the ability to change the visibility for all layers in the group. By turning on/off visibility at the group level, group layers can help save time when working with a map or project. Users can navigate more quickly, as they don’t need to turn on or off individual layers.
Group Layers in Services
Using group layers in services is tricky, as they aren’t universally supported with all service types. While you can use group layers when publishing a map service to a standalone ArcGIS Server or ArcGIS Enterprise, group layer publishing is not supported in ArcGIS Online. When attempting to publish to ArcGIS Online, a warning message will appear in the service editor window before publishing, indicating that group layers are not supported.
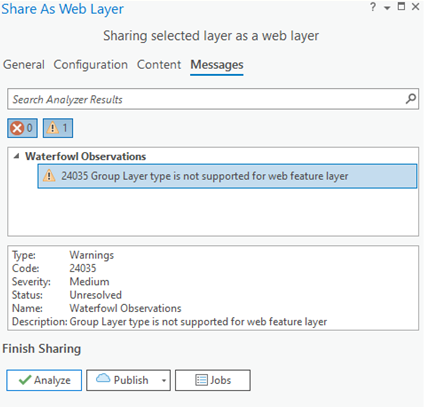
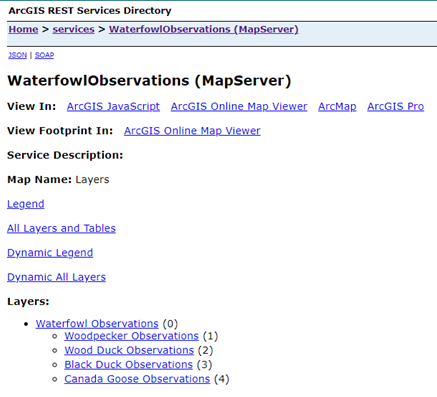
If you move forward with publishing the layers, the group layer is automatically omitted, and the contents are broken into standalone layers. The results of publishing a group layer to ArcGIS Online can be seen in the image below. Notice that we only have the four individual layers and nothing representing the group layer.

Suppose you are looking to utilize group layers in a service. In this case, the only option available is to use them in a map service when publishing to a standalone ArcGIS Server or ArcGIS Enterprise. Once published, there will be a rest endpoint for the group and individual layers, giving you the option to work with both layer configurations. Below is what the resulting services look like. Here we see the Waterfowl Observations in the 0 position with the others numbered after it instead of just the individual layers we saw above.
If you want to learn more about what services support group layers when publishing, you can view Esri’s help documentation found here.
Group Layers in ArcGIS Online
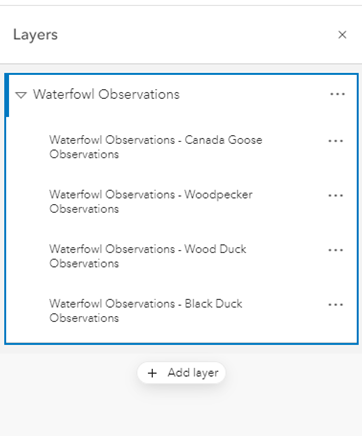
With the changes to ArcGIS Online over the past year, we saw the release of the new Map Viewer which included the introduction of group layers. This change allows for users to have more flexibility with their services and map configurations. By having the group layer option in the map, you can change the group’s contents based on the map or project you are working on without having to use the same grouping of services that might be published together.
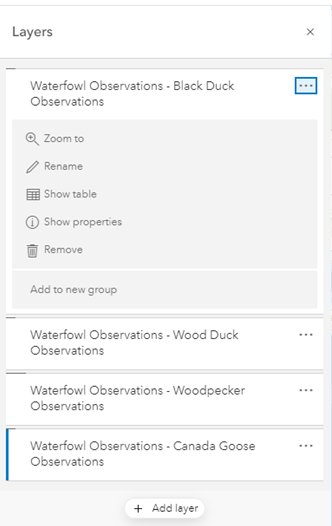
Once you’ve added your data to the Map Viewer, choose the three dots (…) next to a layer to expand a list of options, including Add to new group. Selecting this will create a group for you to add other layers to. Once a group is created, it will show up as an option when you go to add additional layers, or you can make more groups.
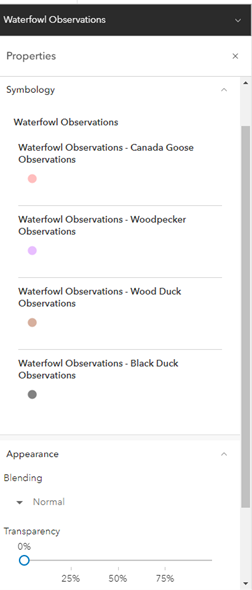
Like in ArcGIS Pro, creating a group layer in the Map Viewer allows for some symbology settings to be set for the entire group in addition to the settings for the individual layers. As seen below, the symbology options are grouped into one panel, which allows you to still interact with individual symbology or apply settings like transparency and zoom scale to all layers at once. Applying some settings to the entire group helps save time spent on individual configuration and checking to ensure things are all at the same level.
It is worth noting that the group layer functionality is not available for use in Map Viewer Classic. Additionally, the group layer functionality is not compatible with all web applications, such as Web AppBuilder. If you want to utilize group layers in a specific application, we recommend doing a quick test to ensure the functionality is compatible and works as expected for your use case.
Time to Spring/Fall Clean Your Map Contents!
Now that you’ve got an understanding of the do’s and dont’s of group layers, it is time to put that knowledge to use. Over time, a map or application may shift from when it was created, and new functionality is introduced or discovered. Taking the time to revisit your information products helps ensure they are still meeting your organizations needs and introduce things like group layers to improve user experience!