


Ubuntu is an open-source Linux distribution based on Debian. The name Ubuntu is an ancient African word meaning ‘humanity to others’ reminding us that ‘I am what I am because of who we all are’.
Ubuntu comes in a variety of flavors and specialized derivatives. It has special editions for servers, OpenStack clouds, and connected devices. Ubuntu server is the operating system for the OpenStack project, AWS, Azure, and Google Cloud. Ubuntu is a supported operating system besides Windows for installing and managing your ArcGIS Enterprise geospatial needs. In this article, I will be going through the required steps for a base ArcGIS Enterprise deployment on Ubuntu server 20.04 LTS in AWS cloud provider.
Let’s Get Started!
Deploy the Server
To begin, launch the Ubuntu server that meets ArcGIS Server 11.1 system requirements in AWS. You will log into your AWS account where you deployed Ubuntu. Make sure the instance is currently running. You should see a green check next to Running. Now, connect to the server with Secure Shell (ssh) using any remote access tool.
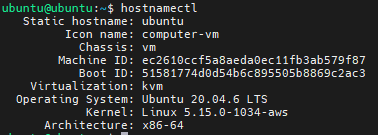
Verify that Ubuntu is running by using the command $ hostnamectl in the command prompt. To verify that Ubuntu meets ArcGIS Enterprise system requirements use the command $ hostnamectl in a bash shell.
Post Installation Updates
Once Ubuntu is running and you are logged in, use the command $ sudo apt update && sudo apt upgrade -y to do the update and upgrade non-interactively.

Install Web Server/Tomcat
Now we need to install Apache Tomcat, a web server requirement. To download and install go to Apache Tomcat site. After downloading extract the gz file into a folder and create a soft link for regular updates using the command $ sudo ln -s. Give Tomcat user ownership of the folder and make it executable with the command $ sudo chmod + x.


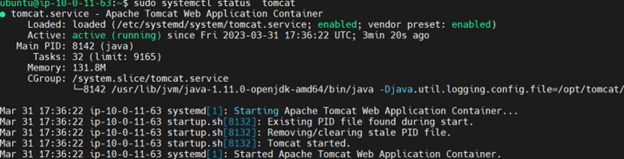
Check if Tomcat is running before you proceed using the command $ sudo systemctl status tomcat. If Tomcat returns active (running) proceed.
Modify the Connector port value from 8080 to 443 for secure connection “https” in server.xml file under tomcat installation folder/conf.
Copying Esri Installation Resources to the Ubuntu Server
Login into My Esri, download installation files for a base ArcGIS Enterprise deployment, and copy them to your Ubuntu machine using a network file transfer called “SCP”. Run the command $ sudo scp -i.


Extracting ArcGIS Installation files
I will create a folder in /temp called arcgis to extract the installation files. The benefit is when you restart the system, everything in /temp folder is flashed, streamlining cleanup.


Creating an ArcGIS user and Location for Software Installation
Create arcgis & assign password using command $ sudo useradd && sudo passed arcgis. Now create installation folder using command $ sudo mkdir/your path.

The Installation folder must be owned by arcgis. To do this you will use “chown” command to give arcgis ownership of the installation folder, $ sudo chown -R arcgis: arcgis/your path.

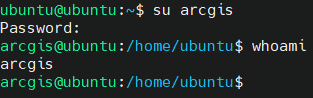
Now you will log into the Ubuntu server as arcgis using command $ su arcgis. Check if arcgis is logged in with $ whoami
Install ArcGIS Portal, Server and Datastore as arcgis user
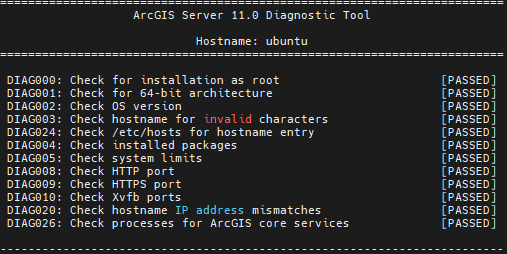
Set file handle and process limits in /etc/security/limits.conf before the installation and run the ArcGIS diagnostic tool for each Installation file using the command $ vi/etc/security/limits.conf. Now save and exit!
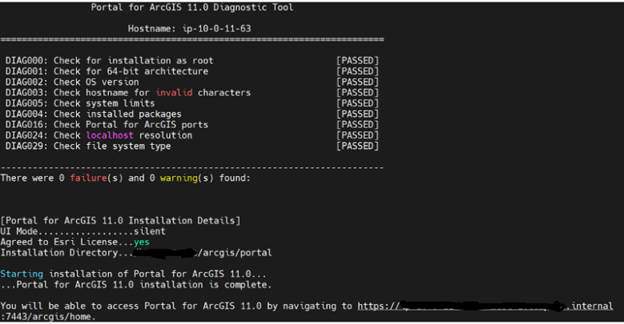
To run the diagnostic tool go to the extraction folder of the portal under /portal/tools/portaldiag and run portaldiag shell script with the command $ ./portaldiag.
Install the Web Adaptor and configure it with the Portal using port 443. After installation create portal and configure with the Web Adaptor.


Create Server site after installation and configure with Web Adaptor.

Post Installation Configuration
Set up Server startup/Systemd
If you want ArcGIS Server to start with the operating system, complete the steps specific to your operating system. Copy the Server installation folder/framework/etc/scripts/arcgisserver.service to ?etc/systemd/system.

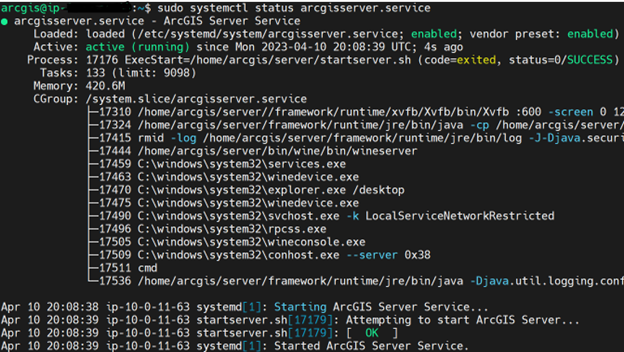
Enable, stop and start arcgisserver.services with $ sudo systemctl command.


Check if ArcGIS Services are running with command $ sudo systemctl status arcgisserver.services.
Federate an ArcGIS Server site with the Portal
We have now installed Portal, Server, Data Store and Web Adaptor on Ubuntu. Configured Portal and Server with Web Adaptor. Registered the Data Store with Server. The last step is to federate ArcGIS Server Site with the Portal. If you need assistance with federating Geo Jobe can assist you!
Our Services
GEO Jobe can deploy Ubuntu safely and reliably for your organization on any of the public cloud providers, including AWS, Azure, and Google. We offer self-managed and managed service cloud deployment! Reach out to our team today via e-mail for a free-hour consultation!
Want to read more of our articles? Check out these that may interest you!
- The Potential of ArcGIS Knowledge: Advantages and Integration Strategies
- A Kubernetes Comparison part 1: Amazon EKS
- A Kubernetes Comparison Part 2: Azure Kubernetes Service (AKS)
- Computer Vision and Convolutional Neural Networks in ArcGIS
- How to Add the Geoevent Server Extension for ArcGIS Monitor
- Overcoming challenges when migrating from ArcGIS Online to ArcGIS Enterprise