Have you ever used an app to snap a funny filter on your face and share it with friends? Have you been online reading restaurant reviews and clicked a link for directions to take you there? Maybe you’ve wondered how different applications can access your hardware, location or other applications. Or maybe you haven’t, because it often works seamlessly. The applications are able to do these things because of APIs.
What is an API?
API is an acronym for “Application Programming Interface.” To put it simply, it allows different applications to interact with one another within a set of defined rules. It simplifies software development by allowing applications or systems to exchange data and functionality easily and securely. If a developer builds an application that needs access to your camera or allows you to see directions on a map, they can use APIs to communicate with those services instead of writing that code themselves.
To demonstrate, we’re going to create a web page that displays this week’s weather forecast using the National Weather Service’s public web APIs.
Going Further & Beyond
This article is an introduction to some general basics. GEO Jobe’s MapThis! blog has several articles covering JavaScript APIs, particularly in relation to Esri’s ArcGIS JavaScript API. Consider leveling up your knowledge and coding with these articles:
- GEOvisualization Techniques Using the Esri JavaScript API by Jesse Malley
- GeoDev Opportunity – Build a Widget Using the ArcGIS API for JavaScript by GEO Jobe
- Three Ways Esri’s JavaScript API Saves You Time by Courtney Menikheim
- Checking Out the Esri JavaScript API v4.18 by Courtney Menikheim
What You Need to Begin
Some knowledge of HTML, CSS and JavaScript is recommended. The full code is provided at the end of the tutorial.
If you would like to follow along with the code, you will need a text editor. You can use the included software for your computer, such as NotePad on Windows or TextEdit on macOS. More robust options include software, such as Visual Studio Code or Notepad++. This code was written using Visual Studio Code on Windows 11.
Our web page makes use of the Fetch API to request a response from URLs, the JavaScript Geolocation API to find our computer’s location, as well as two web APIs from weather.gov to use those coordinates to receive a weather forecast:
- https://api.weather.gov/points/{latitude},{longitude}
- https://api.weather.gov/gridpoints/{office}/{gridX},{gridY}/forecast
Synchronous and asynchronous code are both used. The differences are briefly described, and you can find more information in a previous GEO Jobe article by Courtney Menikheim.
View File Extensions
It may be required to view file extensions. Here’s how to enable that on your computer:
Windows 10
- Open File Explorer by clicking the program icon in the taskbar or pressing the Windows key + E.
- Click on the View tab in the upper menu to view the ribbon menu.
- Check the box next to the File name extensions.
Windows 11
- Open File Explorer by clicking the program icon in the taskbar or pressing the Windows key + E.
- Select View → Show → File name extensions.
macOS
- Click the Finder icon in the dock.
- Select Finder → Settings from the menu bar.
- Click the Advanced tab in the Settings window.
- Select the Show all filename extensions checkbox.
Starting the Web Page
Creating the Files
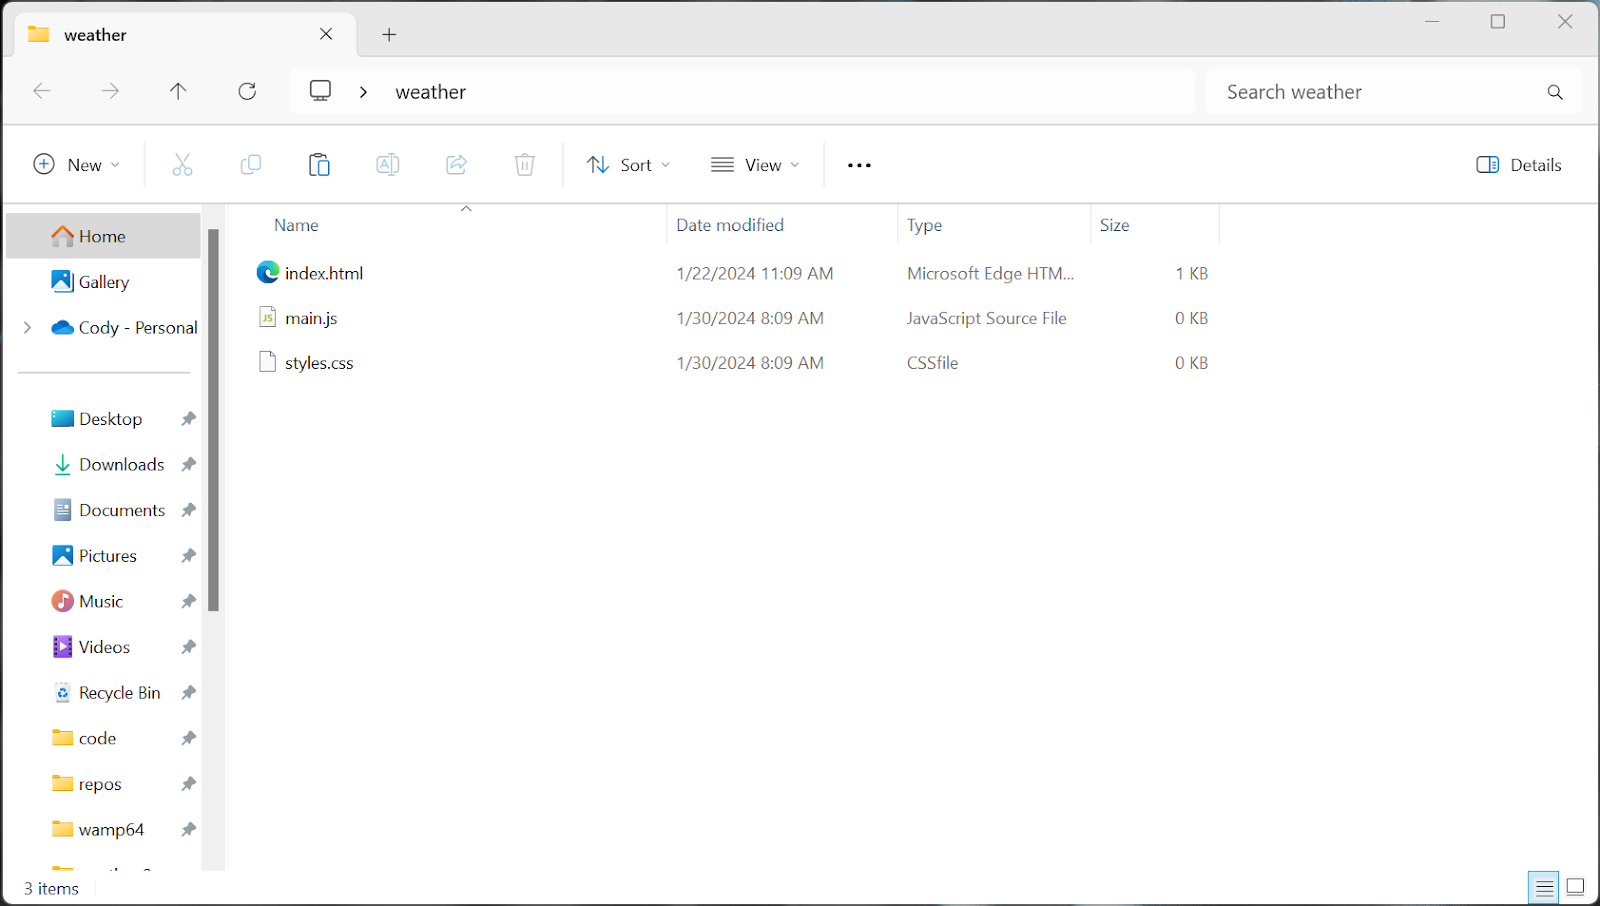
To begin, we’ll need to create some basic HTML. Create a new folder named weather on your desktop.
There are several ways to create the files we’ll need. You should have file extensions visible.
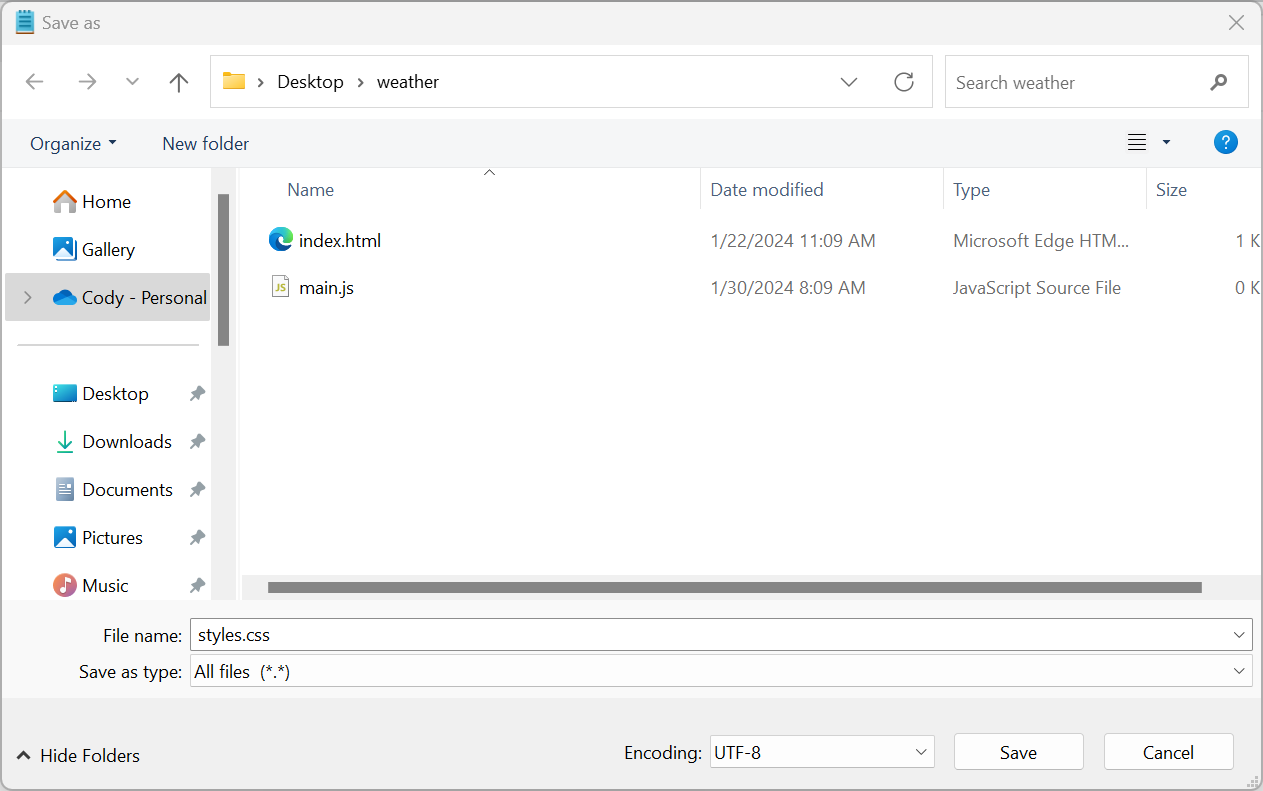
- Right-clicking inside the folder and creating a new text file. Set the name and file extension. If prompted about changing the file extension, choose “Yes.”

- From a text editor like Notepad, choose File > Save as. From the save window, select “All files (*.*)” from the “Save as type:” dropdown, and save the file with the correct name and file extension.
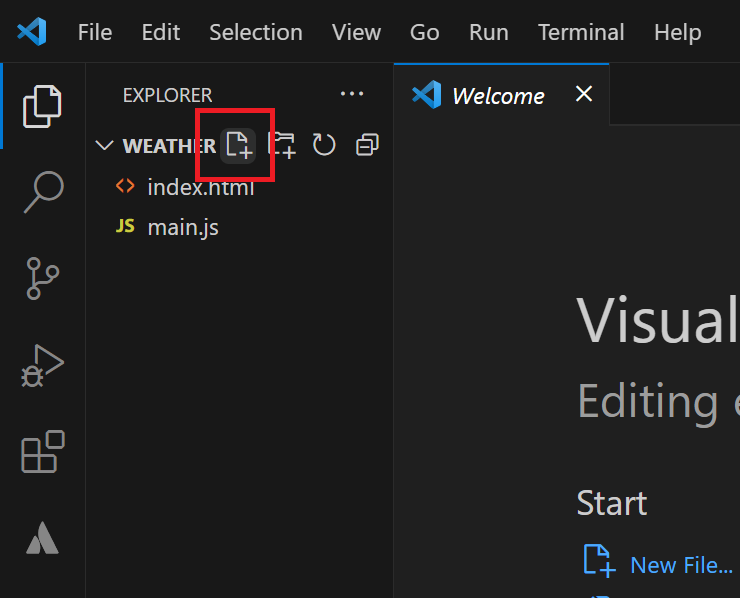
- From Visual Studio Code, open the weather folder, then click the New File… button to create a new file inside the folder.
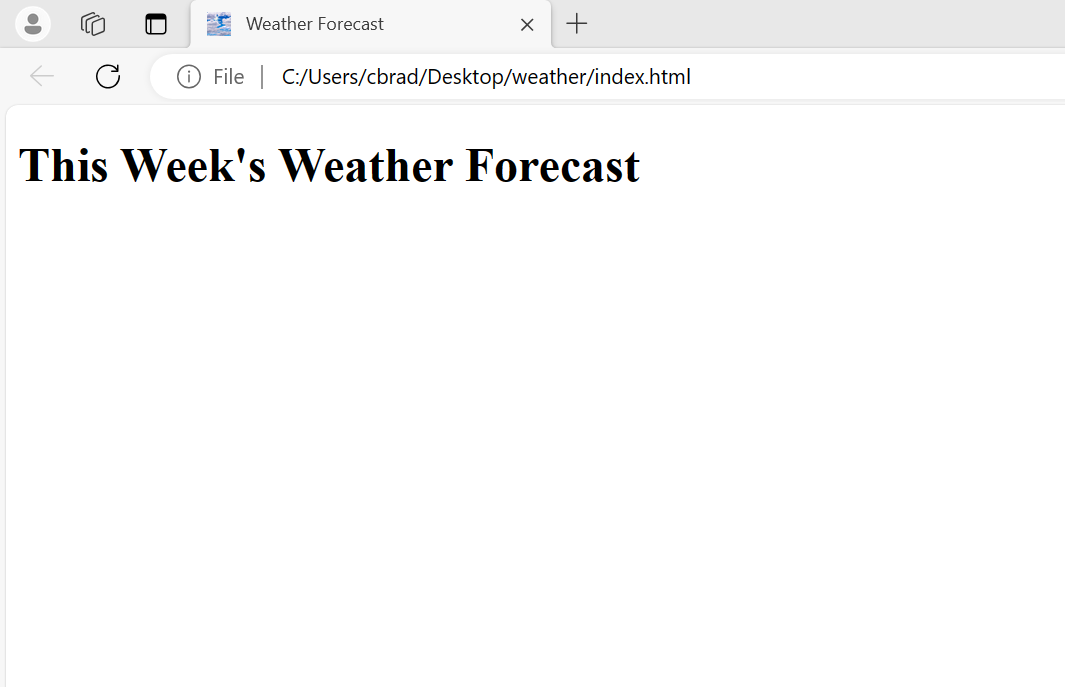
First, create a new file and name it index.html. The file extension must be .html.
Next, create a new file named main.js inside the same folder. The file extension must be .js.
Finally, create a new file named styles.css inside the folder. The file extension must be .css.
Begin Writing
As you follow along, exercise caution when copying the code. Coding languages can be a mix of loose and strict rules. Spacing can sometimes be ignored, allowing you some freedom in creating aesthetically pleasing code structure. Opening and closing brackets ({ }, ( ), [ ], <> </>, etc.) are usually used to enclose a code block. If even a single bracket is missing, your code may not execute as expected. If you have some coding knowledge, you may already be familiar with the sometimes tempestuous nature of coding. After completing the tutorial, feel free to customize the code to your own style and preferences.
index.html
Edit the index.html file using the text editor of your choice by right-clicking the file and choosing to open the file with the application.

We’ve given our page a title under the <head> tag. In our <body>, we’ve also created header text <h1> and a new division <div>. The <div> will need an id to be accessed later, so we give it an id=”card-container” inside the first tag. There is also a <link> in the <head> for ”styles.css” and a <script> that links to ”main.js” in the <body>. This will link the CSS stylesheet and JavaScript code to our web page.
Save the changes, then double-click the index.html file from the weather folder on the desktop. Your web page should open in your browser with the <h1> text on screen.
main.js
Open the main.js file with your text editor and enter the following code:
getCurrentPosition()
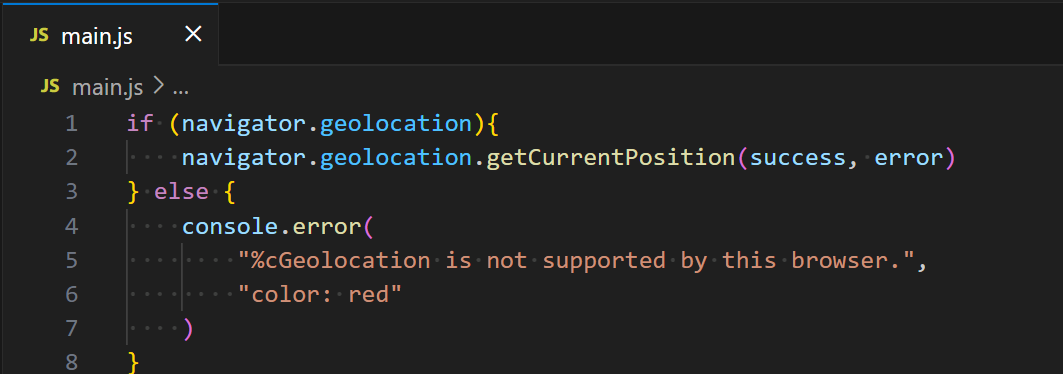
We first use an if…else statement to check if the navigator.geolocation API is supported on the browser. All modern browsers should support it, but it’s good practice to have some error handling in your code. If the API is supported, we’ll be using the getCurrentPosition() method of navigator.geolocation to get our latitude and longitude coordinates. The else statement will run if the browser does not support the API, in which case it will log an error to the browser’s console in red.
getCurrentPosition() can take a few parameters, but we’ll only use the first two, being success and error callback functions. We’ll replace success and error with those functions now.
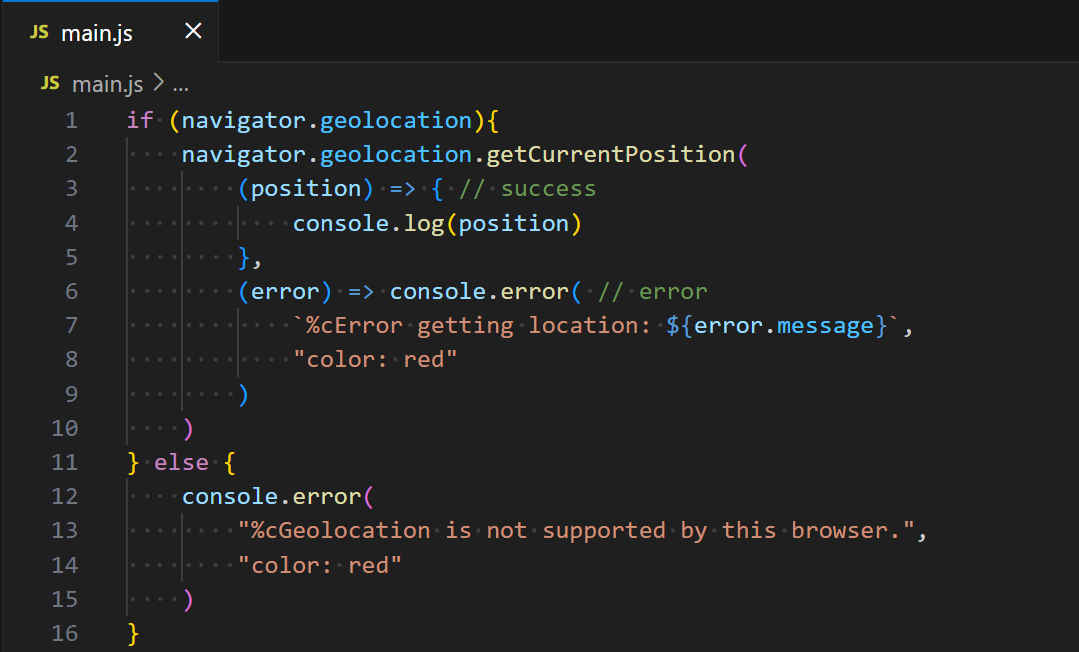
The first callback function is an arrow function that is using position as an argument. This is executed when the getCurrentPosition() method is successful. The second callback function takes error as an argument. This will execute if getCurrentPosition() fails, and it will log an error to the console in red with the text “Error getting location: ” plus the error message received from error.
Note that this error message is a template literal, meaning that it’s surrounded by backtick ( ` ) characters instead of single quotes ( ‘ ) or double quotes ( “ ). This key is found above the tab key on your keyboard. With template literals, we can use placeholder text like ${error.message} to easily insert our code into the text.
Save your changes. If you refresh your web page, your web browser should prompt you to give permission for the page to access your location.
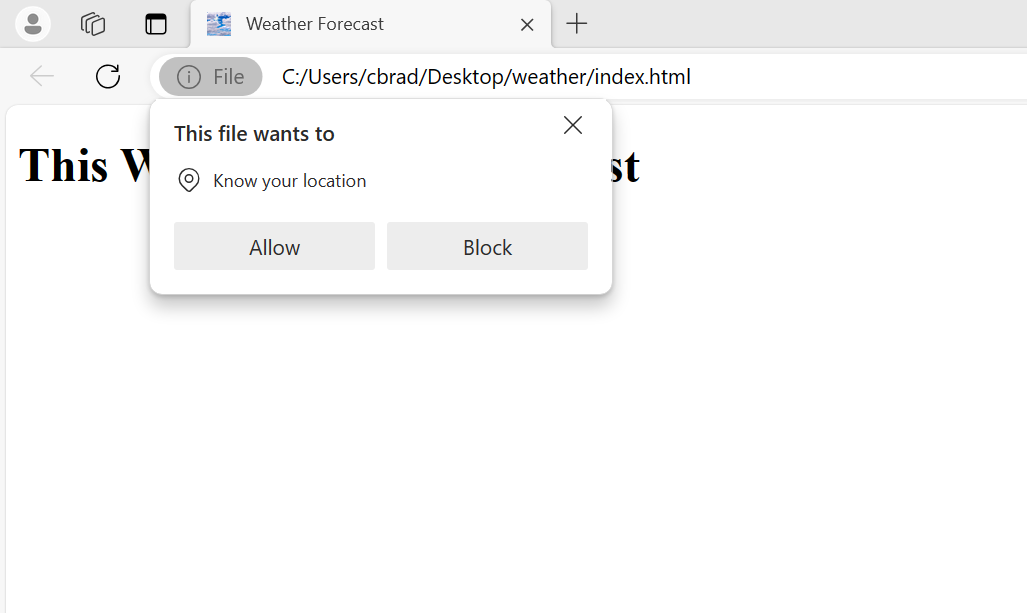
Click Allow. If everything is working correctly, then getCurrentPosition() was successful and the position will be logged to the console.
Web Browser Console
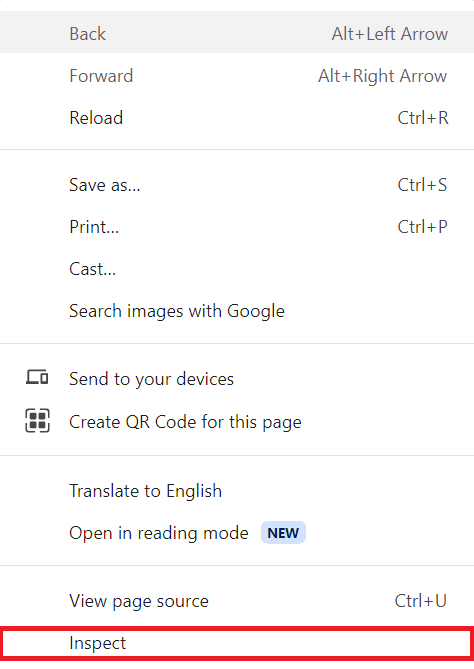
To access the console of a web browser, you can press F12 on the keyboard, or by right-clicking the screen and selecting Inspect or similar option from the context menu. Then click Console in the new pane that appears in your browser.
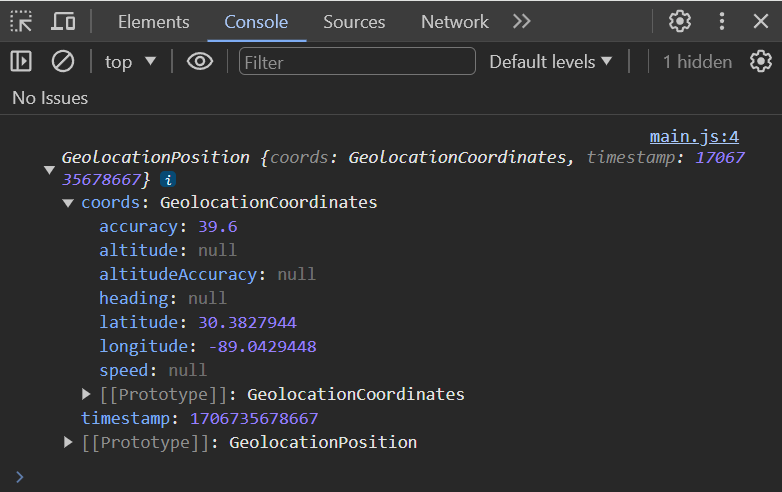
We see position has logged as an object called GeolocationPosition that has the properties coords and timestamp. The coords property also has properties. Clicking the arrows expands the tree to see nested properties, or the properties within properties. We can use dot notation on position to access its property coords, and dot notation on coords to access its properties, such as latitude and longitude (position.coords.latitude and position.coords.longitude respectively).
Latitude and Longitude
Let’s edit the code inside main.js.

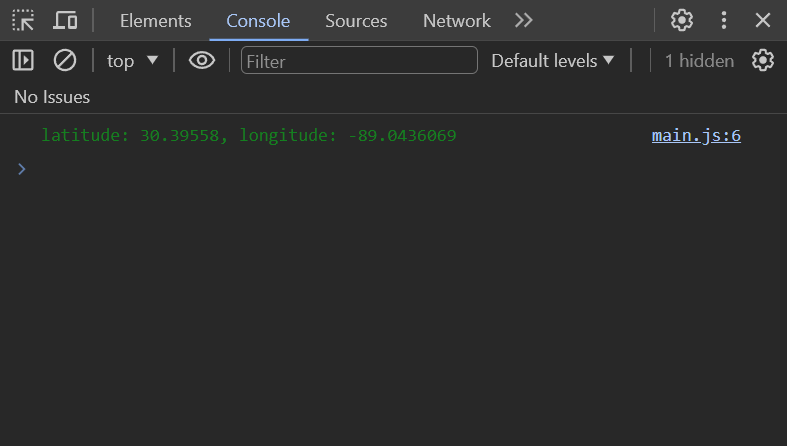
We’ve created two constant variables called latitude and longitude that are storing the nested properties of position. Below that, we are logging them to the console in a template literal with green font.
We’ve successfully used the Geolocation API to get our latitude and longitude. Now we’ll see how we will use them.
Finding Our Forecast
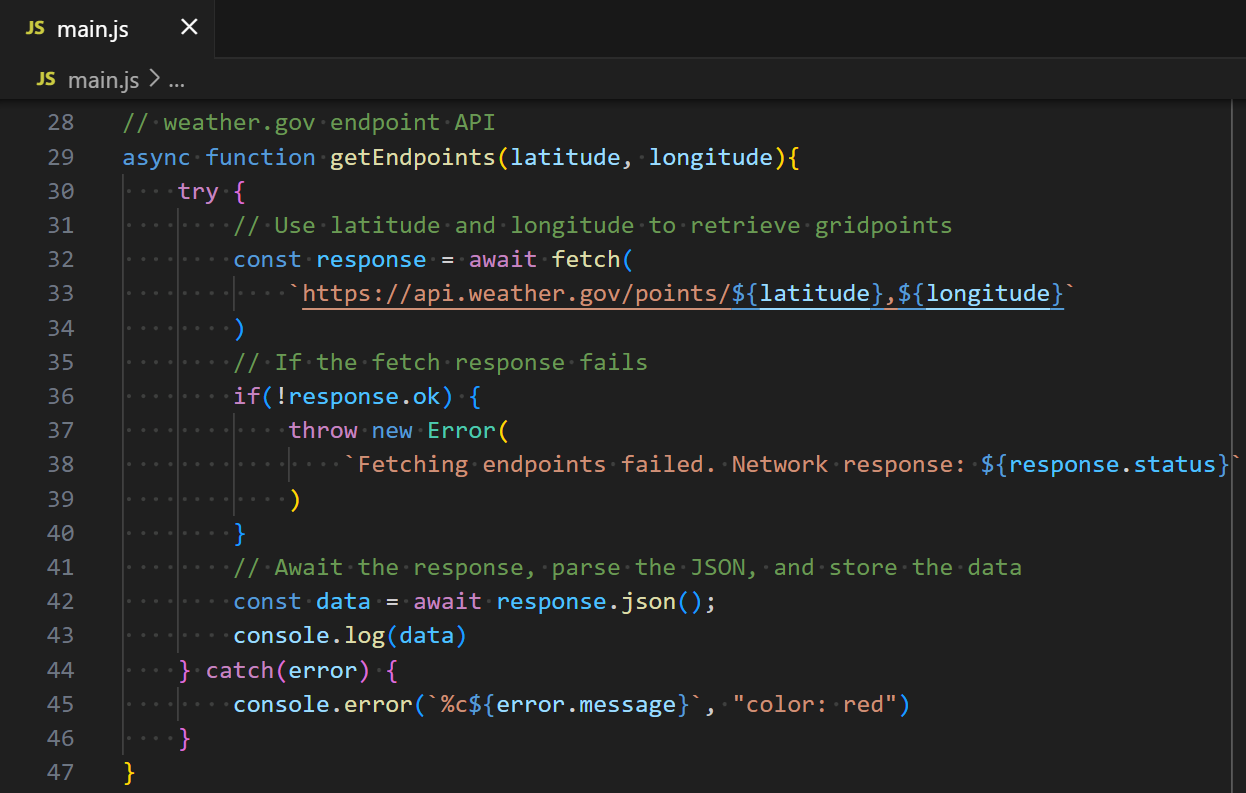
The National Weather Service (NWS) offers free APIs to different weather forecasts, but it needs to know your location to provide this information. We’re going to make use of two of their APIs. The API that delivers our forecast also requires the closest Weather Forecast Office (WFO) and grid points, which we do not have yet. For that, we will make use of another of their APIs, which will accept our latitude and longitude coordinates and deliver the endpoints we require.
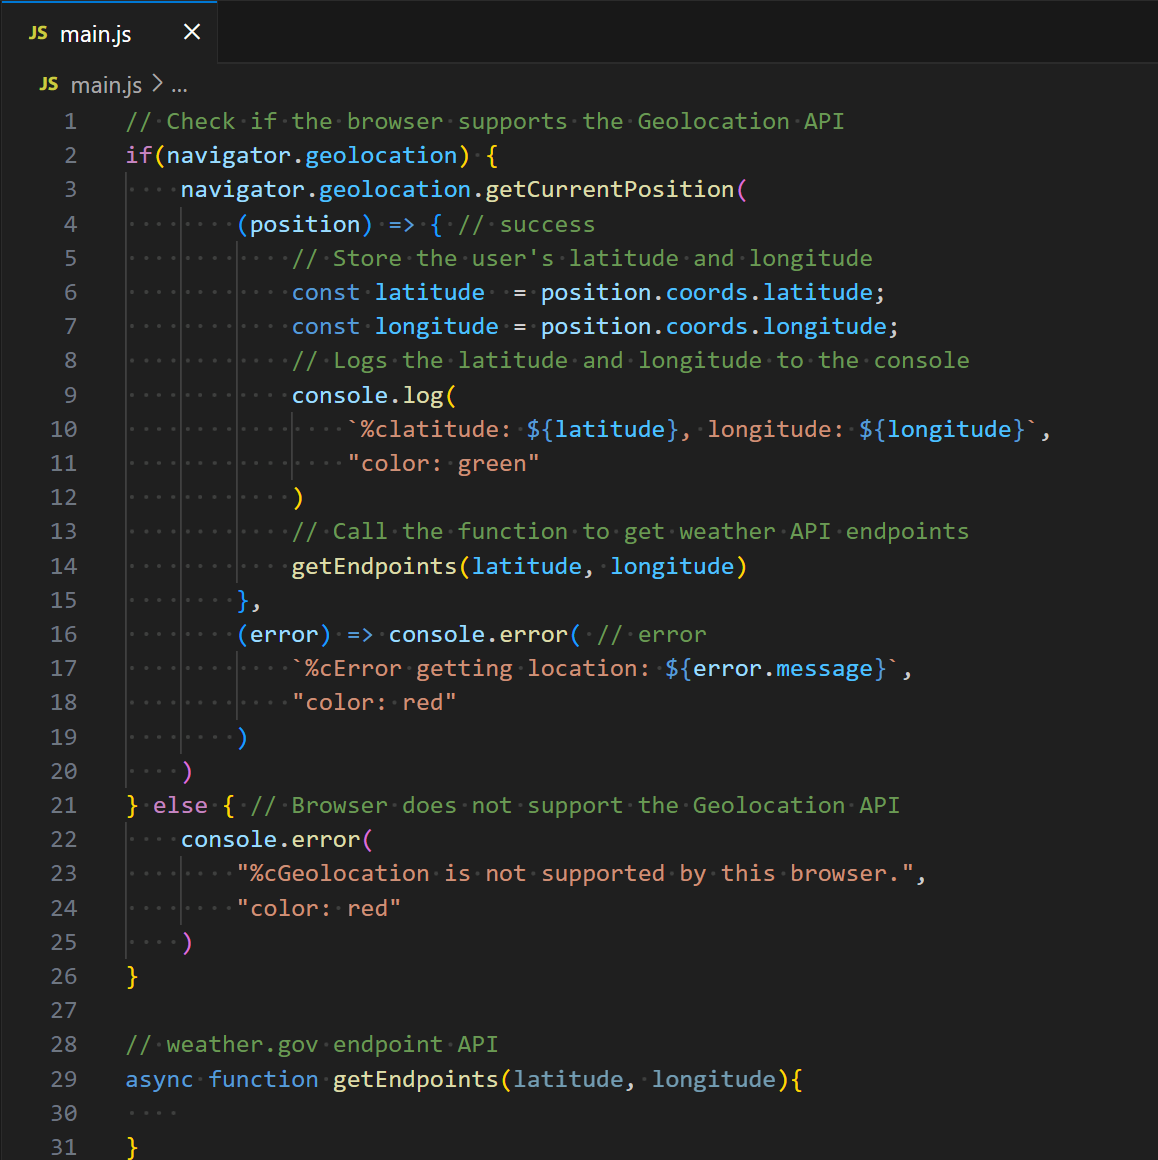
A new async function is created on line 29 called getEndpoints() that accepts latitude and longitude as parameters. The previous code is also updated with comments for clarity, and the new function is called on Line14. The latitude and longitude constant variables are provided as arguments.
Asynchronous Functions
Most code is synchronous, meaning that code executes in order. The functions we create for the weather.gov APIs will need to be asynchronous. This means that the code can run in the background without blocking the execution of other code outside of the function. Asynchronous functions can also delay its own code from executing until a specific event called a Promise resolves, behaving like synchronous code. It’s useful for performing tasks that may take time, such as awaiting information to return from a server.
The getCurrentPosition() method of navigator.geolocation in the previous code is also acting asynchronously; the latitude and longitude cannot be obtained until a user allows the browser permission to find their location. Since the success callback function only executes after permission is granted, the rest of that code awaits the user. This does not prevent other code outside of the method from also running, or our web page from being loaded.
Synchronous and asynchronous JavaScript are discussed more thoroughly in a previous GEO Jobe article by Courtney Menikheim.
getEndpoints()
The following code for getEndpoints() is wrapped in a try…catch statement. The function will try the code inside the brackets. If the code has an error, then it will fallback to the catch code to execute instead.
A variable named response is created to store the result of the fetch Promise. The fetch method is how we will use requests and responses to get the data we need from our API. Fetch is itself an API that allows JavaScript to send request objects to receive response objects between computers, even over a network.
You may recall the API URL we are using here: https://api.weather.gov/points/{latitude},{longitude}
We are using the simplest form of fetch, which only requires a path to our API in the form of a URL string. However, we need to replace {latitude} and {longitude} with our getCurrentPosition() values. We can use another template literal to pass the parameters into the fetch.
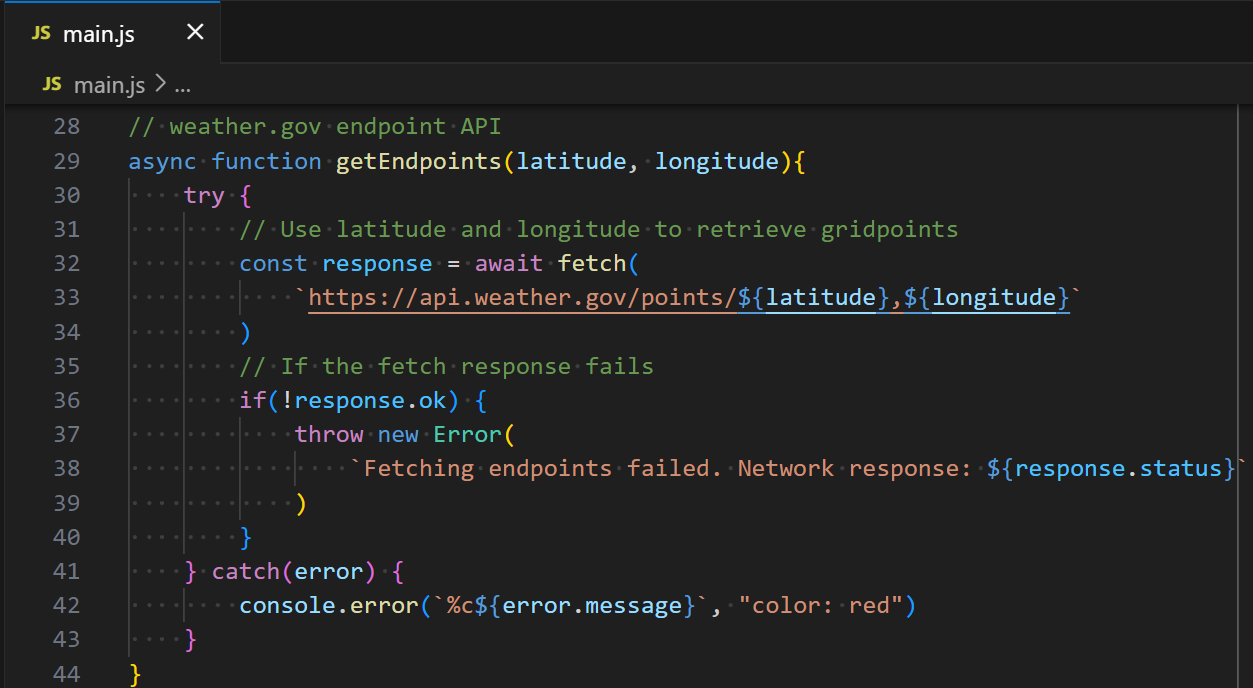
Because we need the information from the fetch request to continue, we use the await keyword. Await can only be used in an asynchronous function with a Promise. The code below will not execute until the request is finished.
Response Object
If we use console.log(response), we can see the Response object returned by fetch. The Response object is a representation of the entire HTTP response.
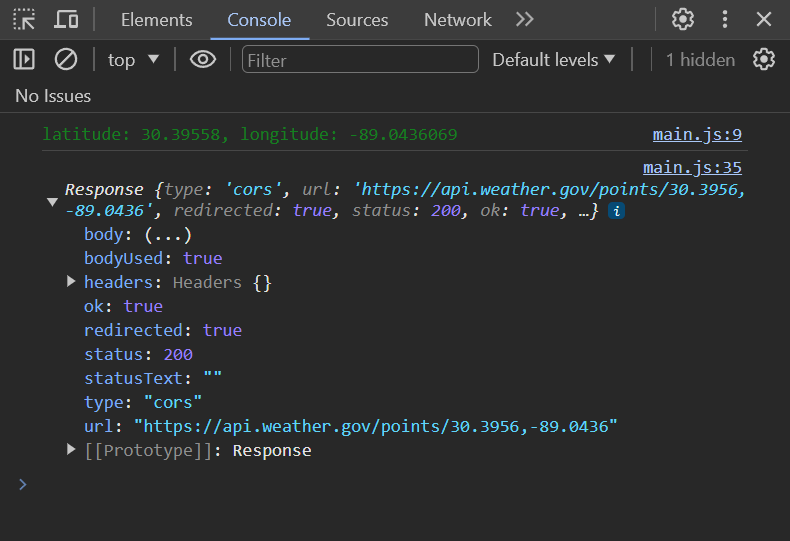
One of the properties of the Response object is ok, which returns true if the network request was successful. Below the fetch request, an if statement uses the logical NOT (!) operator to throw a new error if the network response is not ok, or false. This error will stop the rest of the try code and execute the catch below, logging an error to the console in red with the status received .
Response and JSON
There is more information in the body property of the Response object. We need to extract the JSON (JavaScript Object Notation) data. JSON is a text-based format commonly used in transmitting data through the web. It’s structured just like a JavaScript object, although it can be used outside of JavaScript.
Response objects have the built-in json() method that will return another Promise. This method reads the body of a Response and parses it to JSON format, then delivers a JavaScript object. This is only if the Response object has a JSON body, otherwise, it would throw an error.
To put it simply, response is the whole HTTP Response. Using response.json() parses the JSON from response and returns a Promise. That Promise outputs a JavaScript object.
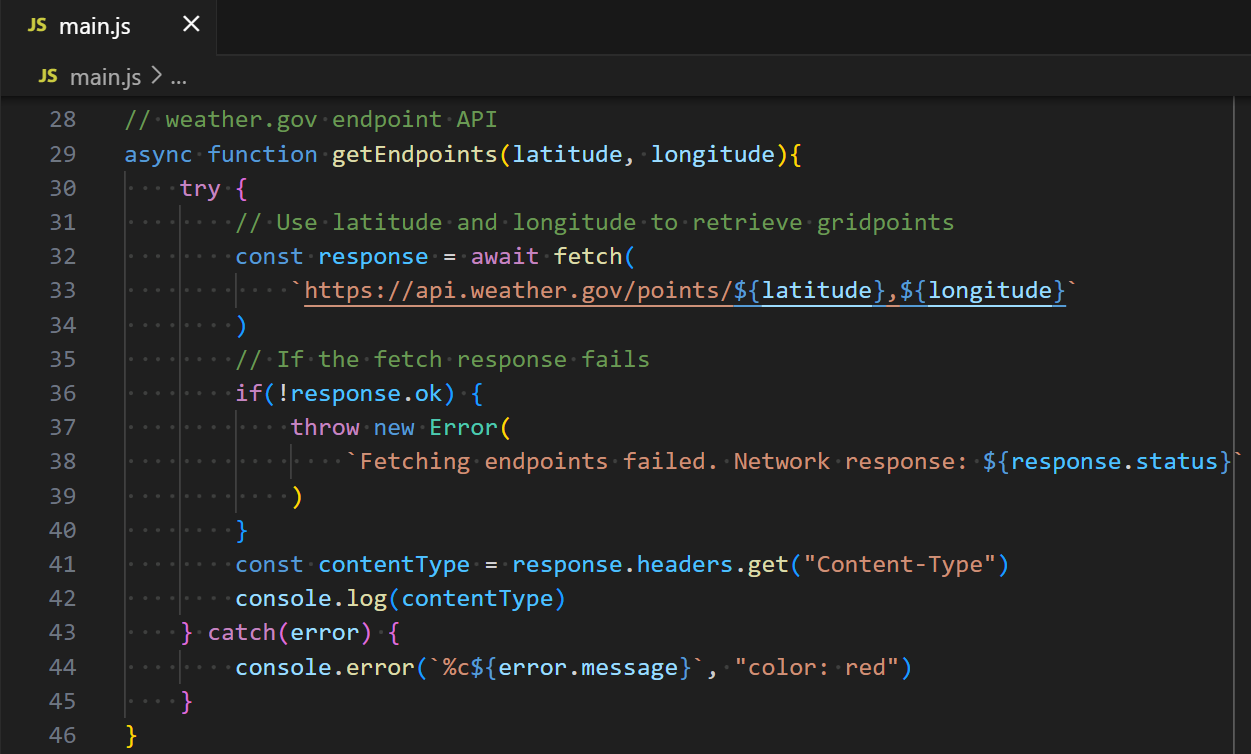
Is There JSON Data?
The web API provider will usually state the format information, but there are other ways to find if an API is in JSON format. The simplest way is to try using the json() method and debugging with console.log() to watch for errors. You can also encapsulate the code in a try…catch, which will throw an error to the catch if the try fails. Another method is checking the Content-Type header of the Response.
In the code below, a new variable named contentType is storing the result of our Response object, named response, using the get() method to find its Content-Type with response.headers.get(“Content-Type”). We then use console.log(contentType) to view the Content-Type below our latitude and longitude.
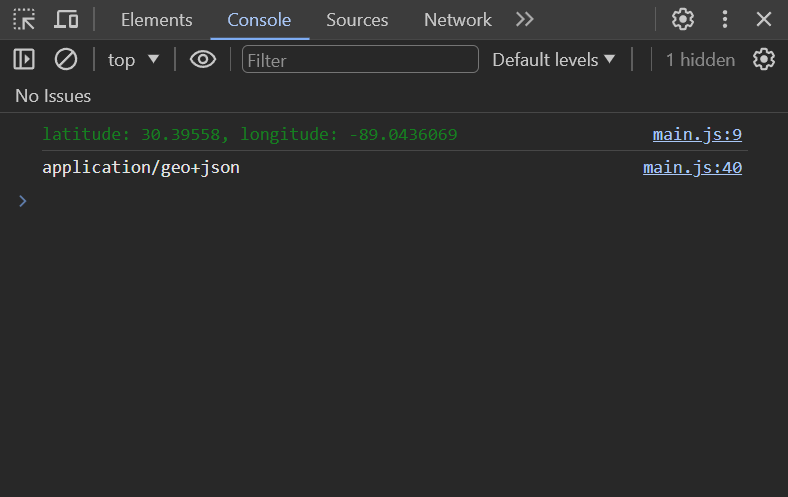
We already know that the APIs we are using have JSON data, so we won’t need to verify this. Delete those 2 lines of code before continuing, or comment them out using // at the beginning of the line.
Storing the Data
Below the if-statement, a new data variable will await the result of the response.json() Promise. We will console.log(data) to see the stored result.
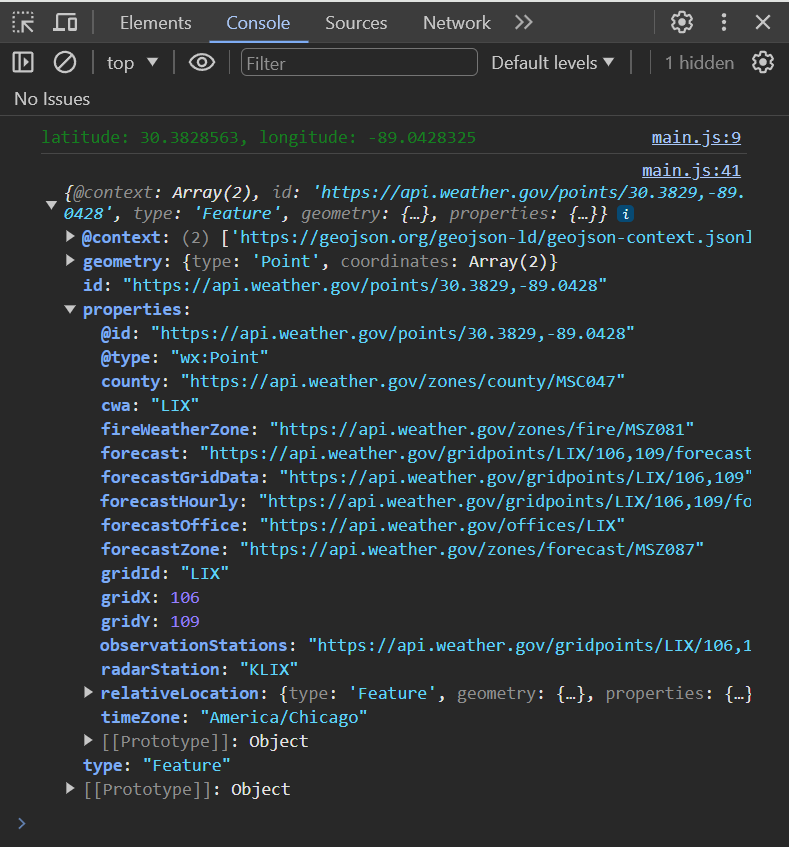
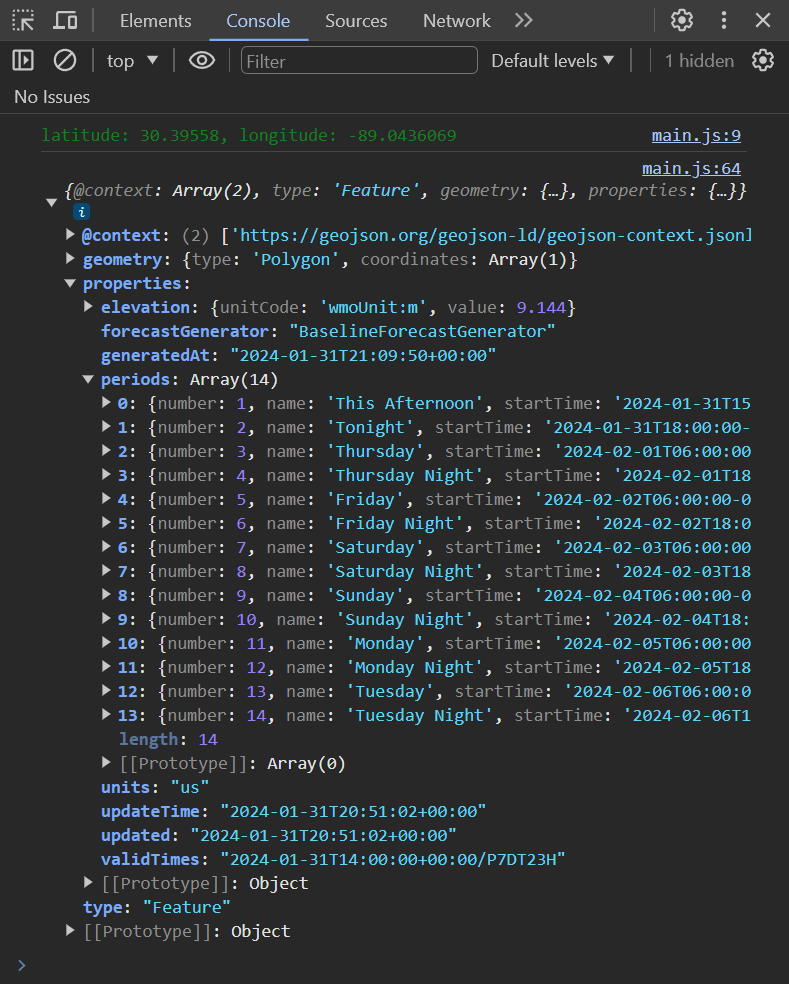
The body of the response has been read to completion as JSON, then converted into a JavaScript object for us and stored in the data variable. The properties and nested properties of data can now be accessed and used. Although there are several elements, we are only interested in the nested values of gridId, gridX, and gridY. This data will be used to get the forecast we need.
You may also notice the API URLs listed here. We can access these nested properties to make another API fetch request for the forecast, but we’ll separate that into a new function instead.
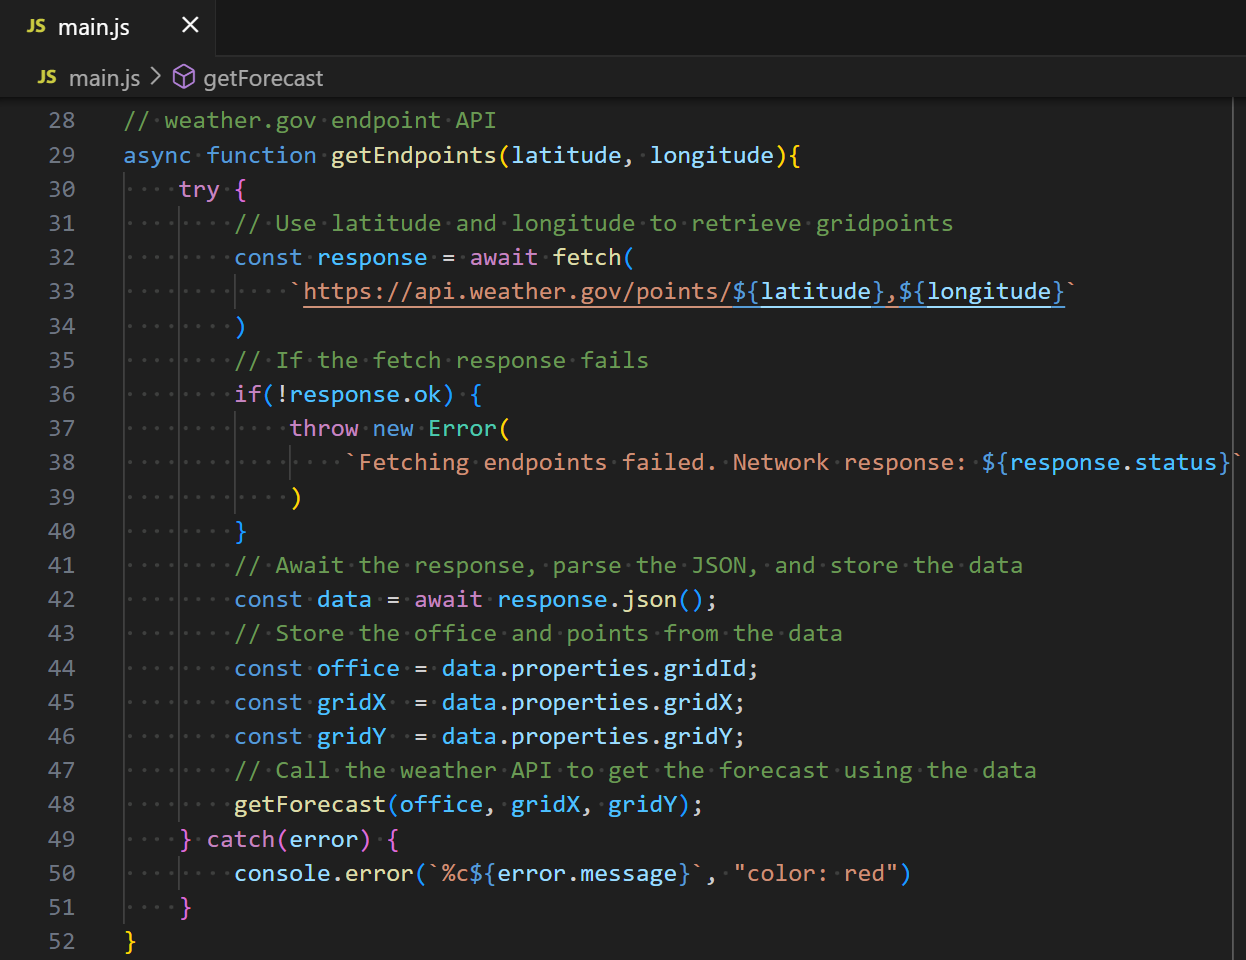
Grid Point Variables
We complete getEndpoints() by storing the nested values into new constant variables, office, gridX, and gridY. We’ll use those variables when we call a new async function getForecast(), created on line 53.
getForecast()
We now have everything we need to make a fetch request to the second NWS API: https://api.weather.gov/gridpoints/{office}/{gridX},{gridY}/forecast
Like before, we will have to use a template literal to substitute the placeholder text in the URL with our values obtained from getEndpoints().
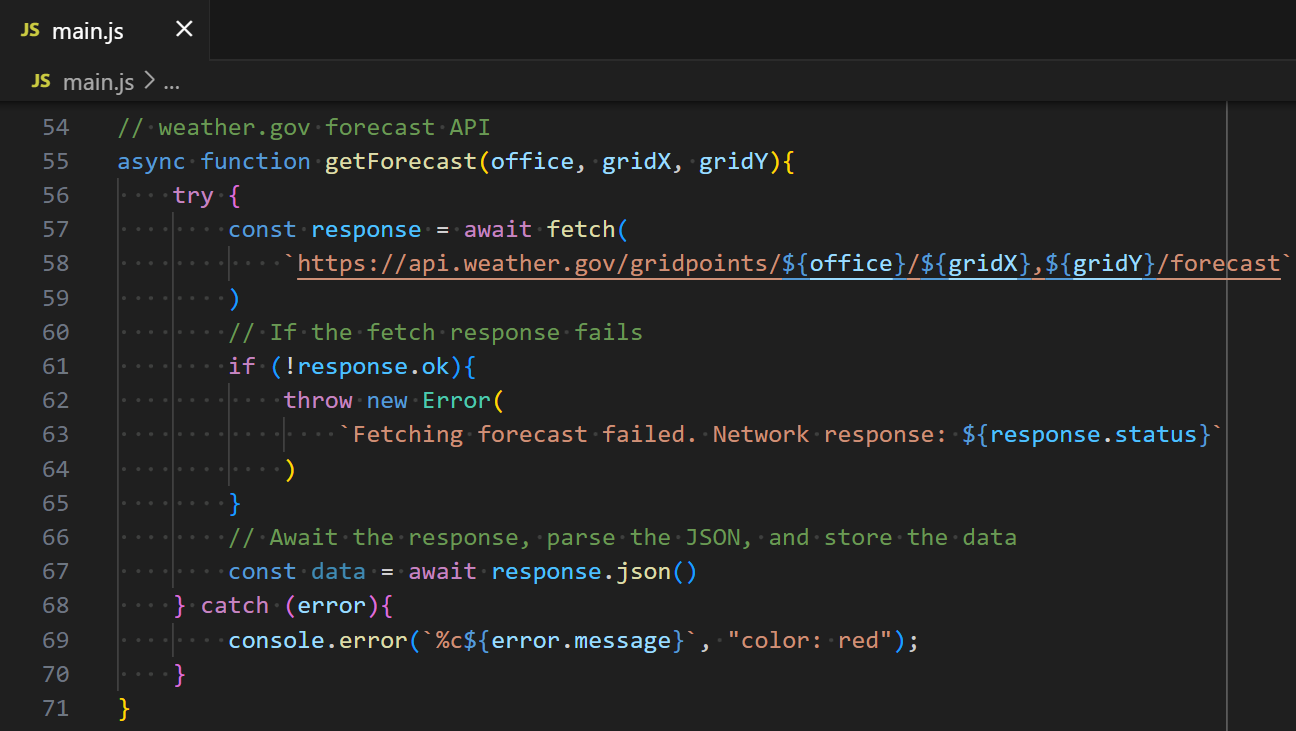
Apart from the fetch URL, the code is so far identical to the beginning of getEndpoints().
Use console.log(data) to find the information returned this time.
Periods Array
This API has returned some new information that we can finally use for our weather forecast. Inside data’s nested properties data.properties.periods is an Array object. Arrays store each element at an index number. In JavaScript, Arrays are zero-indexed, meaning the first element begins at 0 instead of 1, and the last element is the length of the Array – 1.
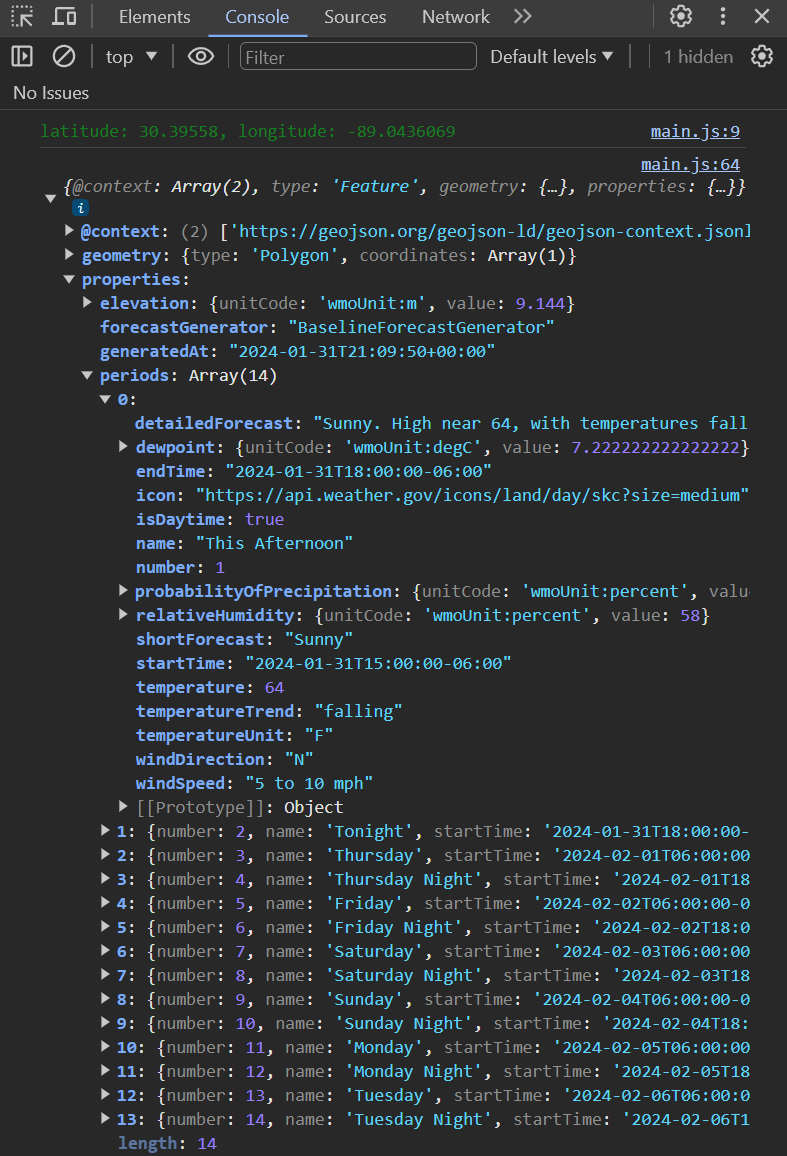
Expanding the first element at index 0 gives us today’s forecast. In fact, it gives us quite a bit of information about the weather, temperature, wind speed and direction, and more. It even gives us a URL for an icon. For the purposes of this demonstration, we will only be using a few items from the Array. Explore this information for ideas on creating something more complex or detailed.
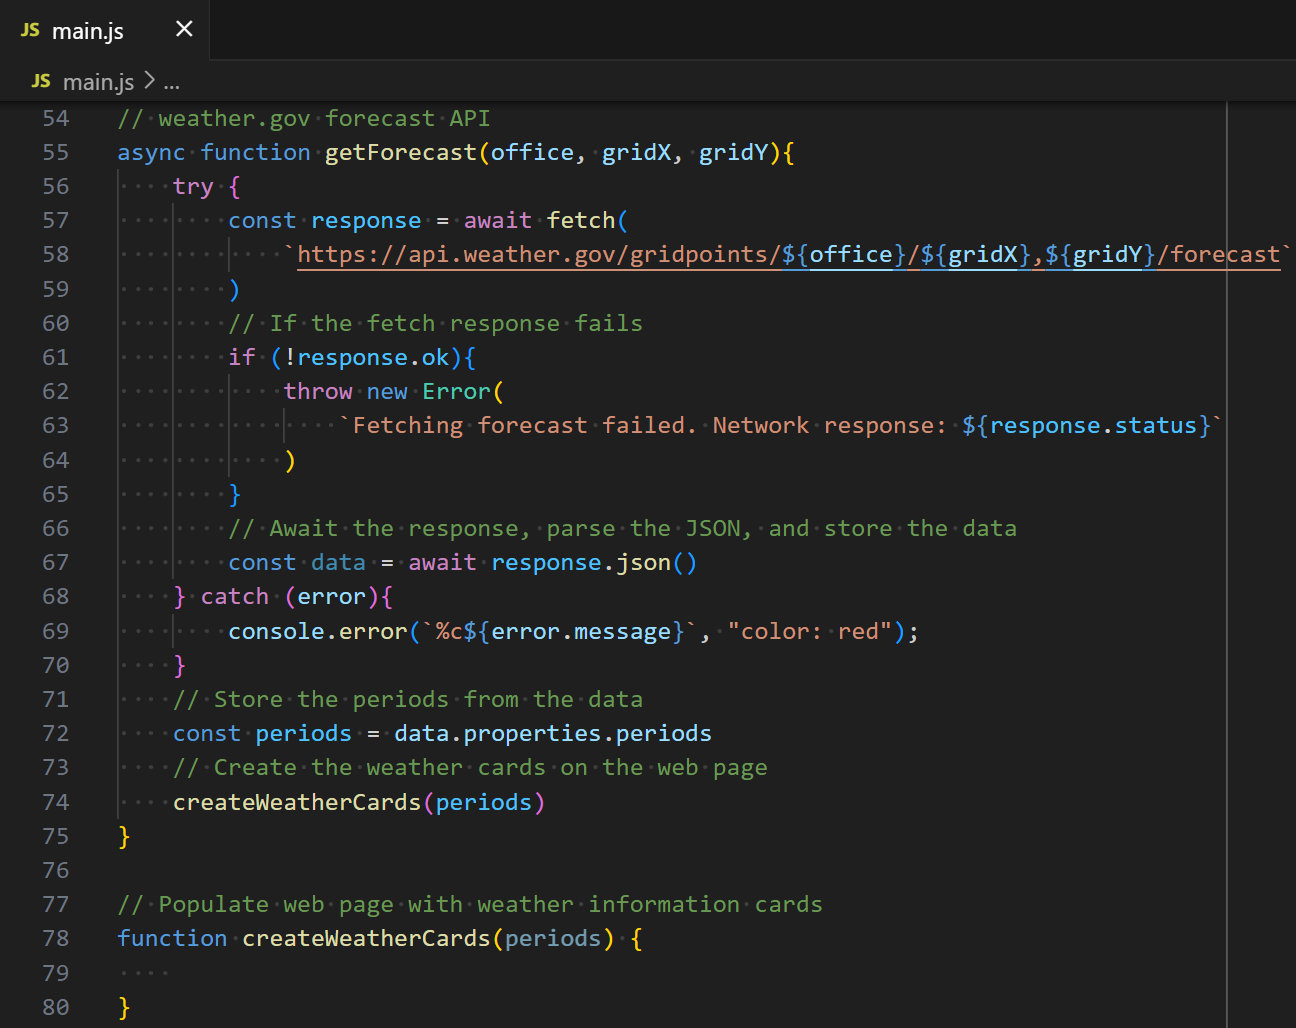
Back in the getForecast() function, the variable periods is created to store the Array found at data.properties.periods. Although we could finish our web page using this information now, it’s good practice to limit a function to one specific purpose. We will send the periods Array to another function to create cards with our week’s forecast. Call the new function createWeatherCards() below the declaration for the periods variable and pass it as an argument. The new function is created on line 74.
createWeatherCards()
As the rest of the code is outside the scope of this tutorial, we will briefly go over its purpose and effects.
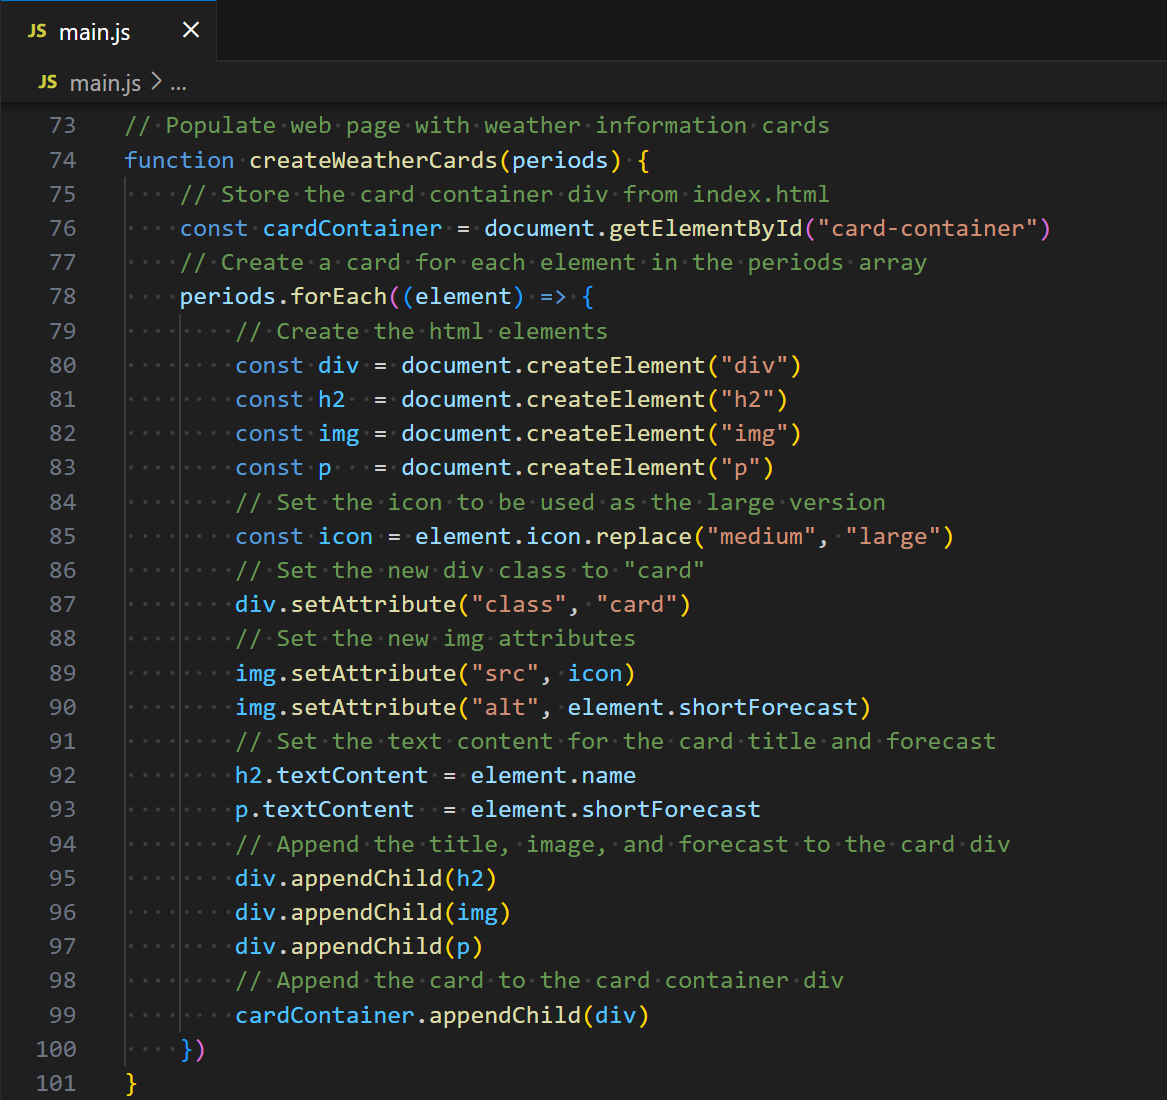
getElementById()
We are going to display each weather forecast as a card on the web page as a child of the HTML <div id=”card-container”> element. First we should have a way to interact with that element, so we use getElementById() to store the <div> in the variable cardContainer.
forEach()
Next we will need to access each element of the periods Array. This is because each element’s properties will need to be stored and placed in its own HTML tags individually. An easy way to accomplish this is the forEach() method of an Array. The forEach() method accepts a callback function that will execute for each element of the Array.
createElement()
Inside the callback function, we create four HTML elements with createElement(); a new <div> that will contain the other elements, an <h2> element for a title, an <img> to store the icon, and a <p> for the forecast text.
Icon
The icon variable will be storing the icon property of the element. You may recall that when accessing the data.properties.periods Array, each element had an icon property with a URL as the value. This URL links to an image on weather.gov. At the end of the URL is the word “medium.” The image has three sizes (“small”, “medium”, and “large”) that live on different URLs. The large icon would look better for the web page, so we alter the URL to replace “medium” with “large”. We can do this easily because the URL is a string with the built-in replace() method.
setAttribute()
CSS will be applied to these elements later, so we use setAttribute() on the <div> element to set its class to card. The <img> attribute src is set to the icon value of the URL, and the attribute alt to a description of the image. The alt text will appear if the image fails to load on the web page, and is also required for accessibility support. We can use the shortForecast property of the element for this brief text.
textContent
The <h2> title and <p> text can be set using textContent. For this demonstration, we will only be using the name (day of the week/time of day) and shortForecast (a brief forecast for the period) properties of each element.
appendChild()
The <h2>, <img>, and <p> are appended as children to the card <div> with appendChild(), and the whole are appended to the card-container <div> on the HTML page.
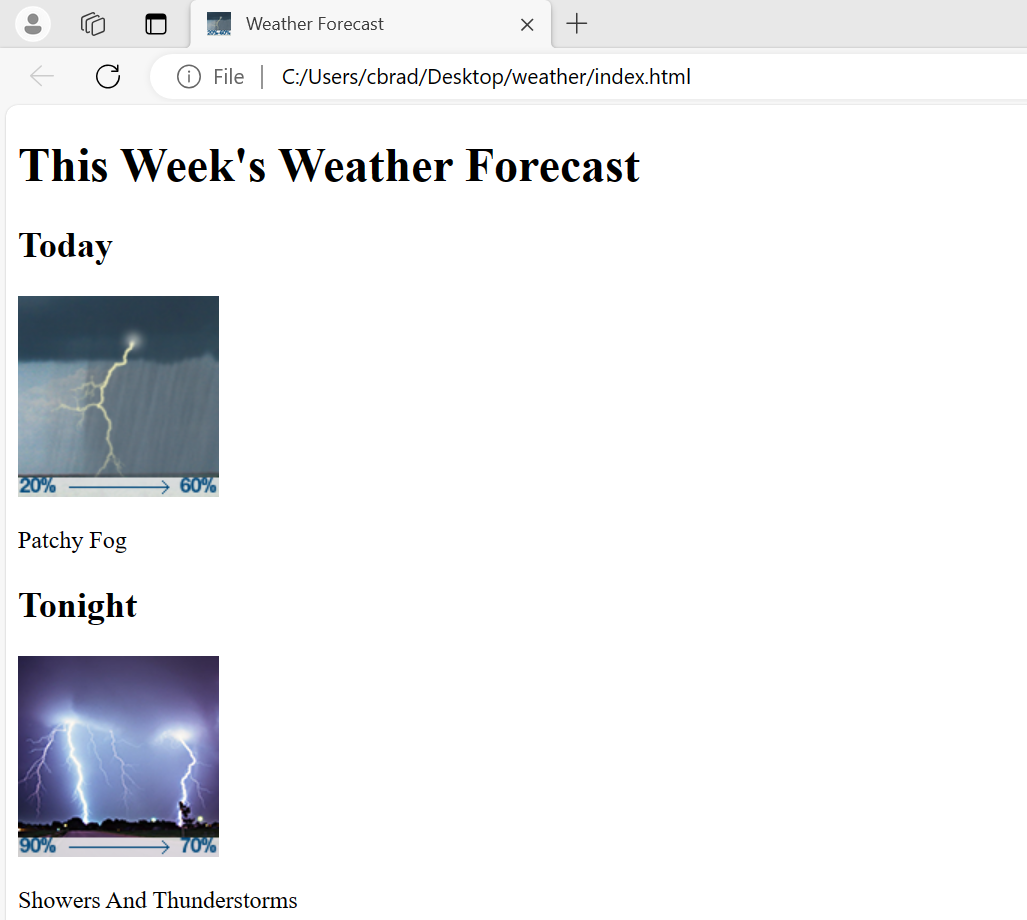
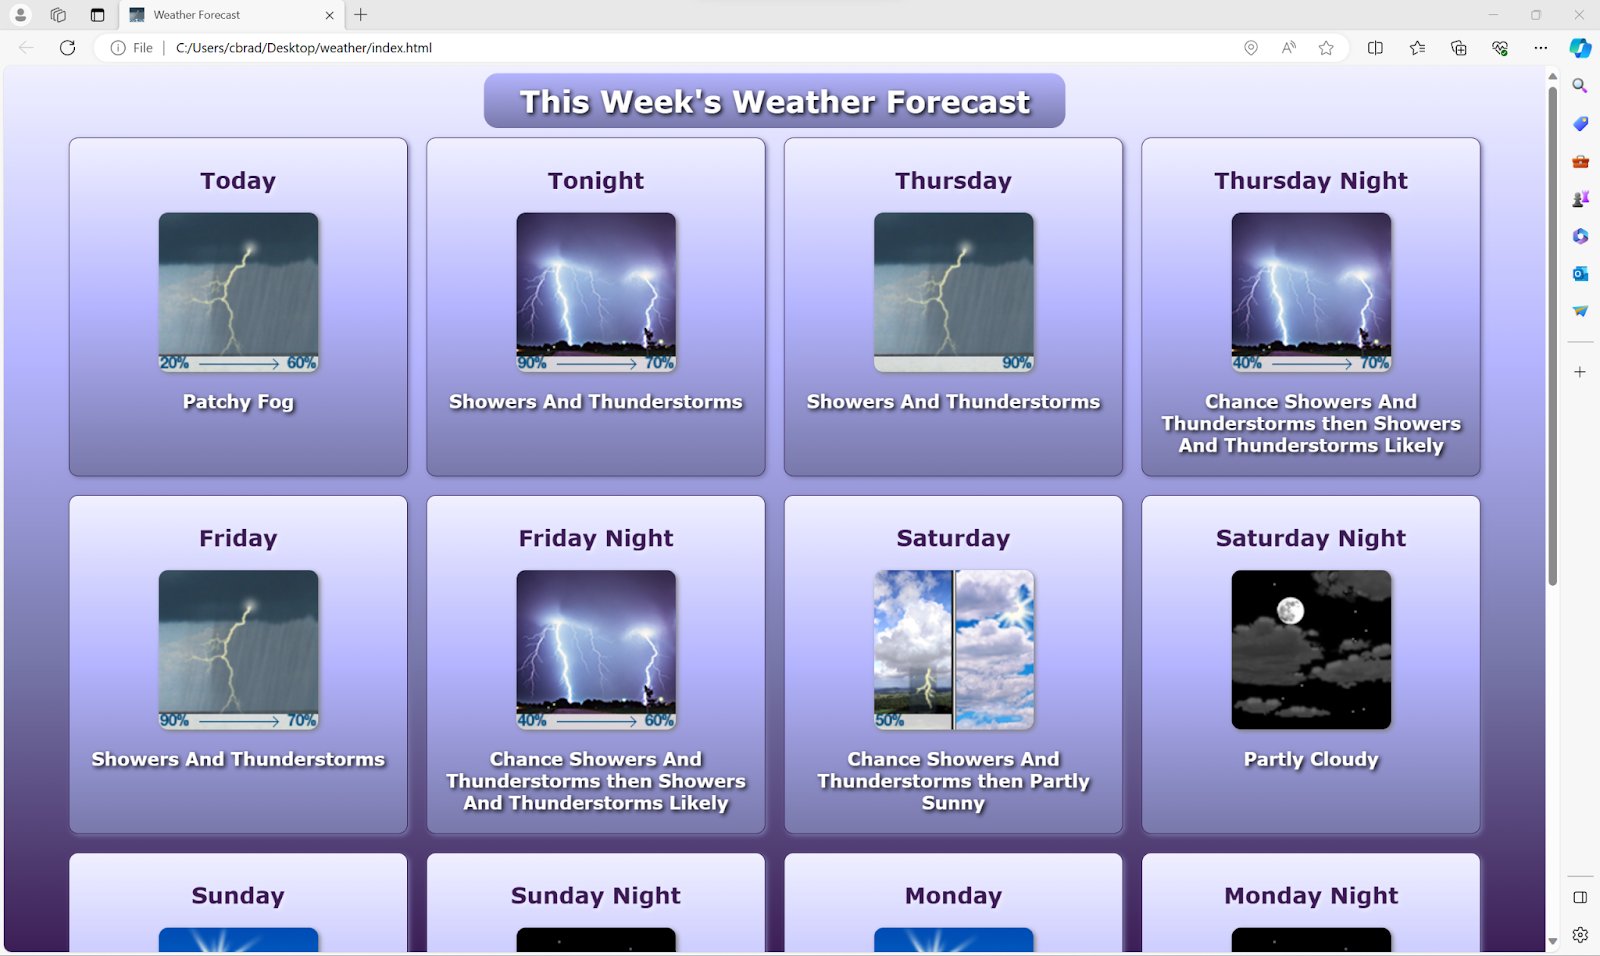
Refreshing the web page should now show each of the fourteen periods with a name, icon, and a short forecast on the page. It may take a few seconds for the content to load after allowing the page to access your location.
Favicon
Optionally, some code can be added after the forEach() method that can provide a favicon to the page.
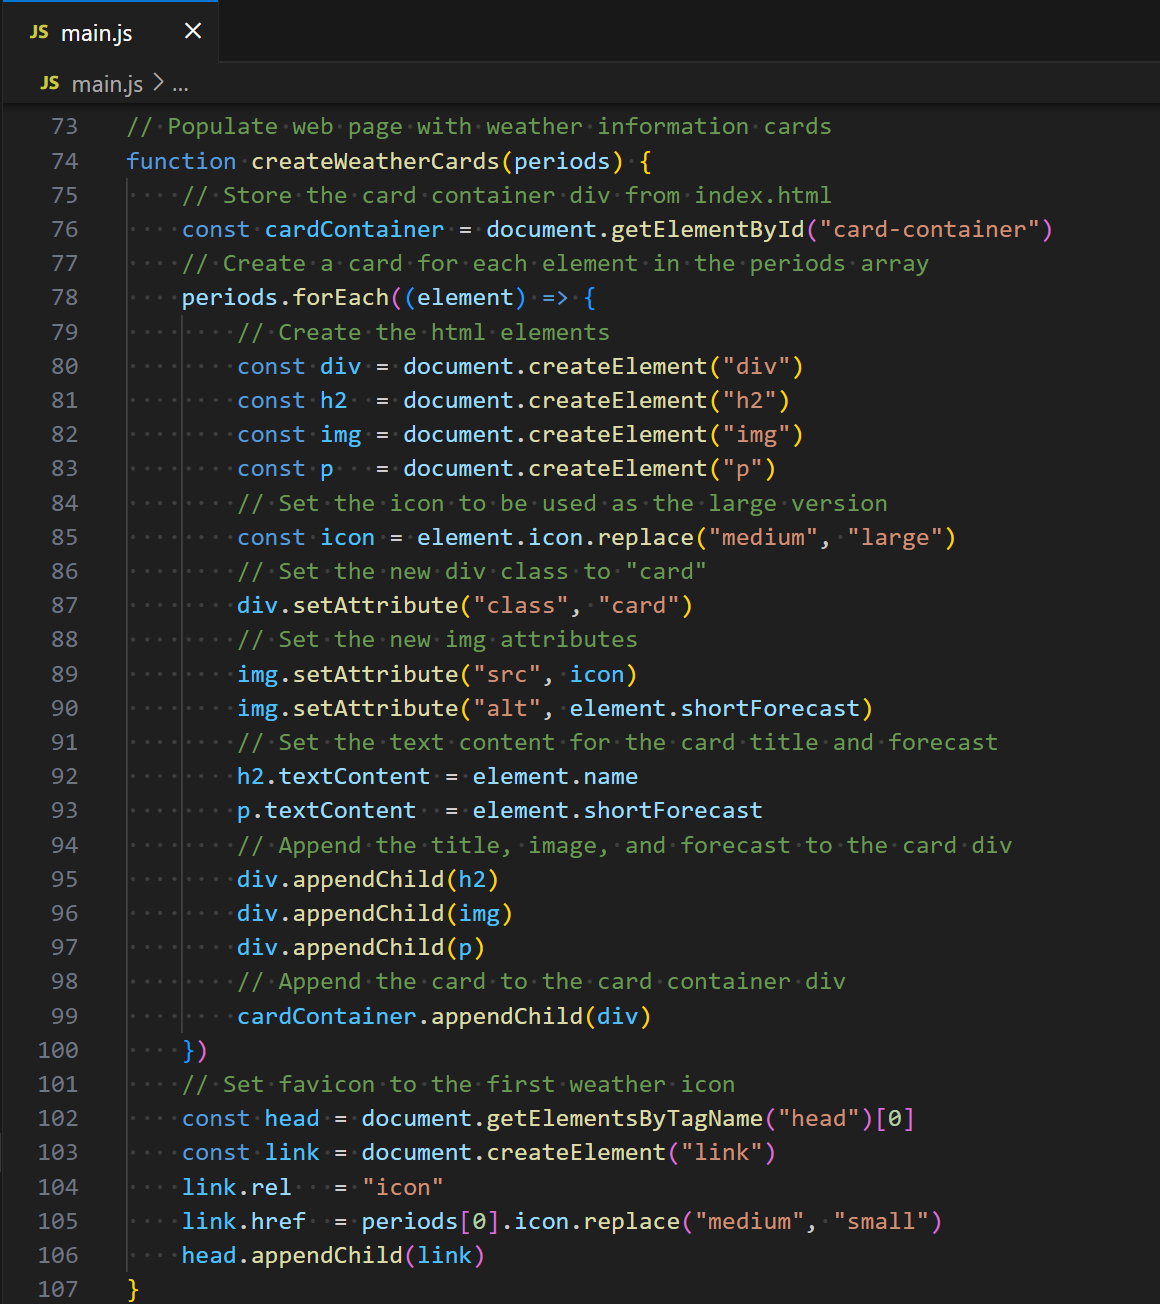
A favicon link is created and placed into the <head> tag of the HTML. The image used is a small version of the first period element’s icon.
Try placing other properties, such as temperature, on your own web page. However, the CSS has been written with only the properties of the tutorial in mind. Modifying or adding HTML tags without updating the CSS accordingly may affect the layout and appearance of your page.
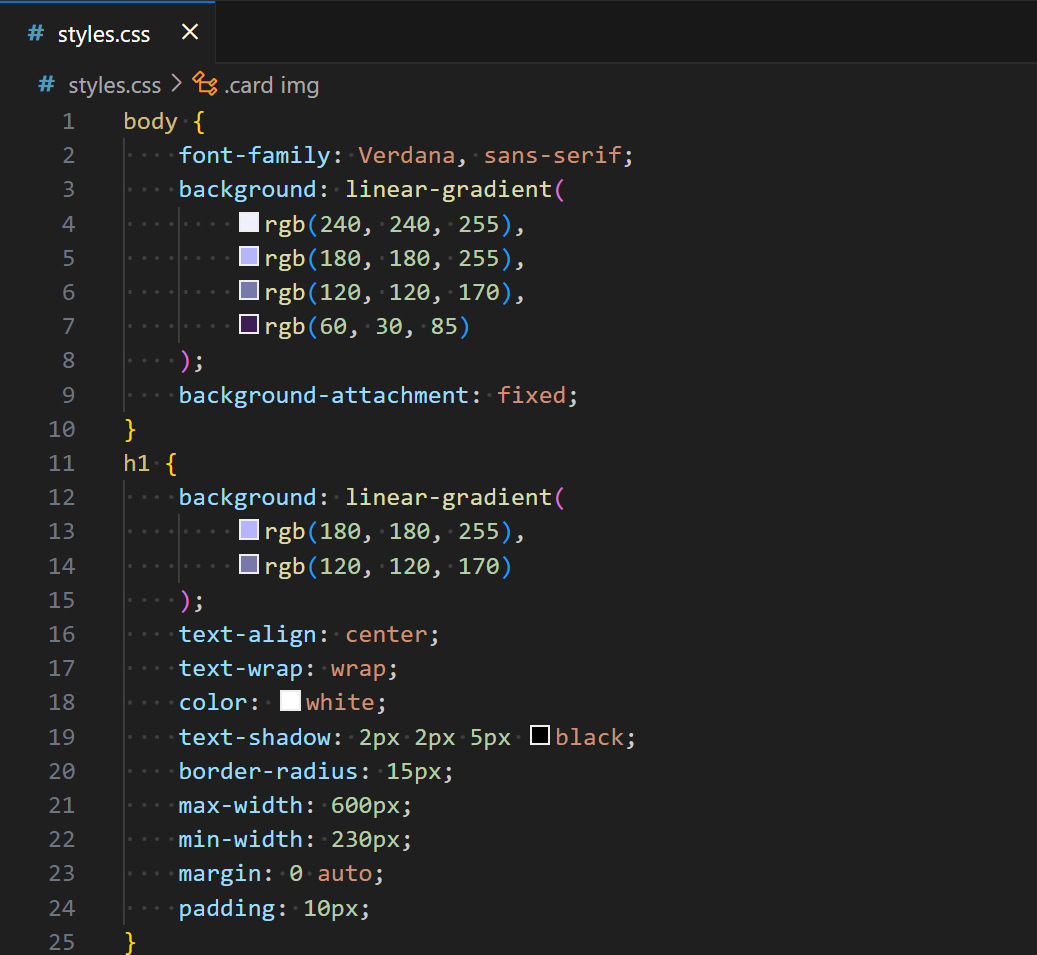
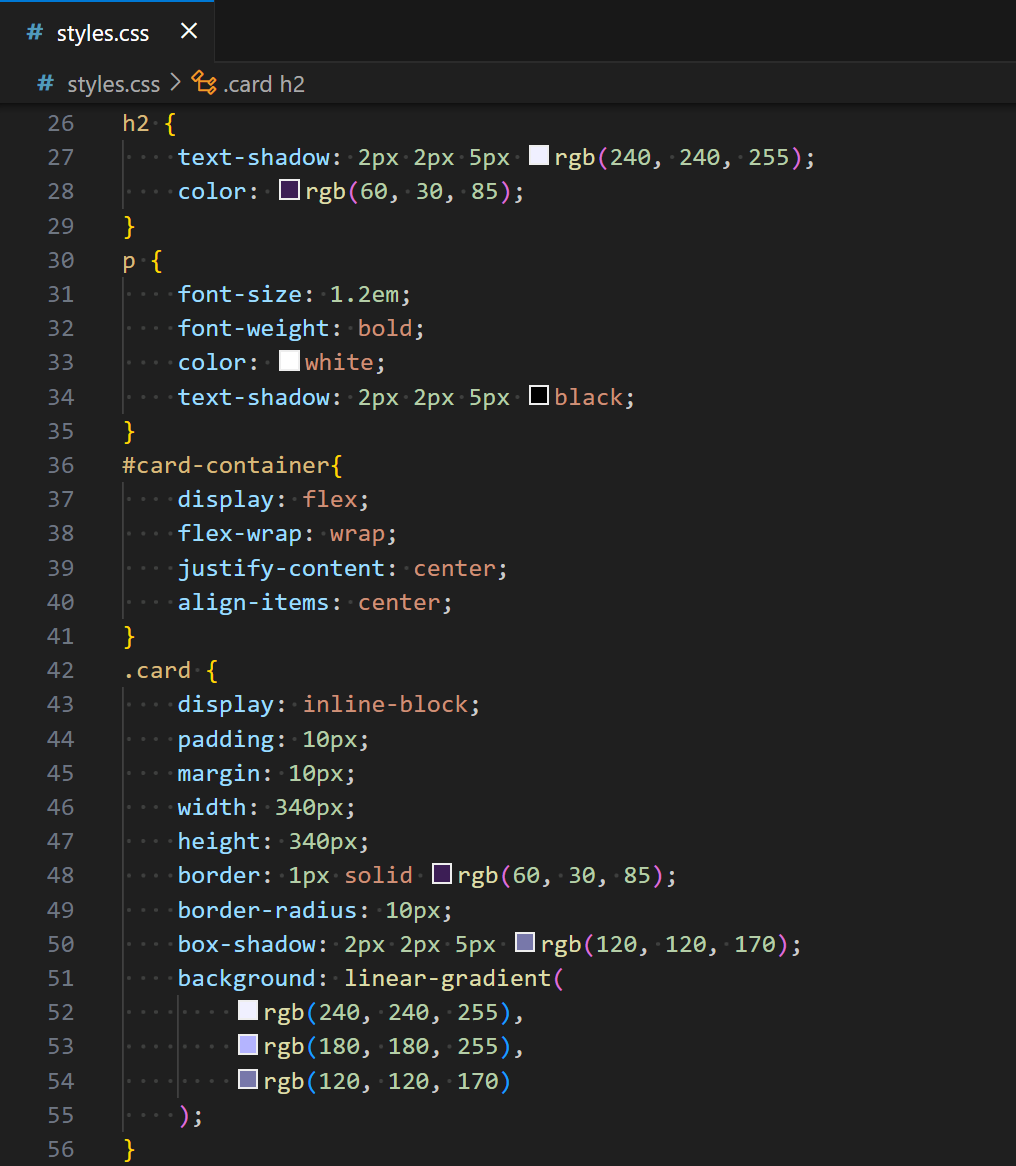
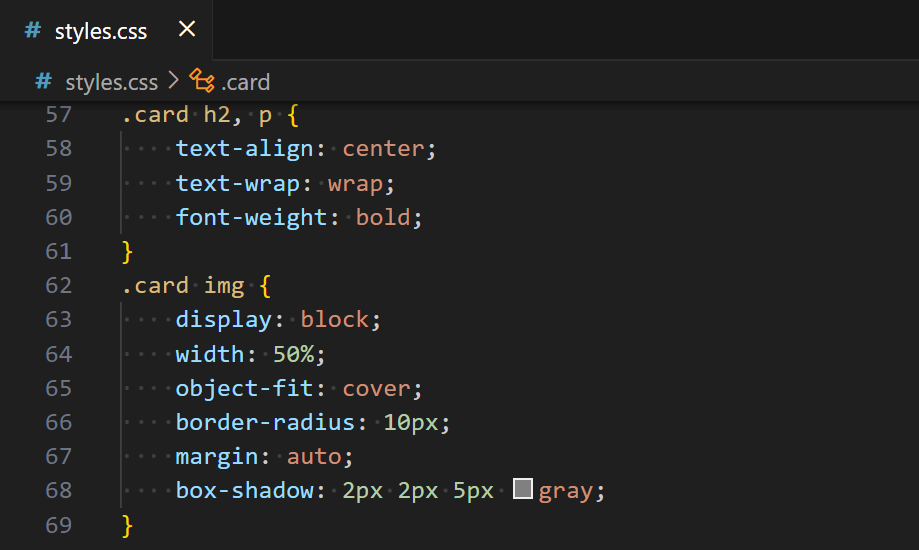
styles.css
Finally, we come to the Cascading Style Sheet (CSS). CSS can be a thorough process, so we will only be displaying the CSS used for the final page here. Modify or replace the text as you see fit. If you’d like to follow along, edit the styles.css file created at the beginning of the tutorial and add the following:
Final Page
After applying the CSS and refreshing the page, the web page is complete. Fourteen cards should be displayed on the screen under your heading. Each card has a title, icon, and short forecast.
Here is a link to the source code for the project.
Try experimenting with the code to further your knowledge and understanding. Add other elements to the page, such as temperature, wind speed or the full forecast. Edit the CSS to display a completely different layout.
Expand your knowledge beyond the basics with GEO Jobe’s MapThis! blog and Esri’s ArcGIS JavaScript API.
To learn about GEO Jobe’s variety of GIS products and services and how we could benefit your organization, email GEO Jobe at connect@geo-jobe.com.